Trail cameras are hidden eyes in the field that help you plan a successful hunting season. Properly used, a trail camera will tell you what game moved through the area, when they are active, and the direction they travel. We gathered the top tactics to help you set up and maintain a hunting trail camera that perfectly captures your next shooter whitetail buck.
How To Set up a Trail Camera
Setting up trail cameras for whitetail deer or other game is not difficult. Whether you are hanging one trail camera or 10, both orientation and height have to be just right. As hunters, we’re used to seeing everything at our own eye level, but that’s not where we want our trail camera pictures taken.
Trail Camera Height
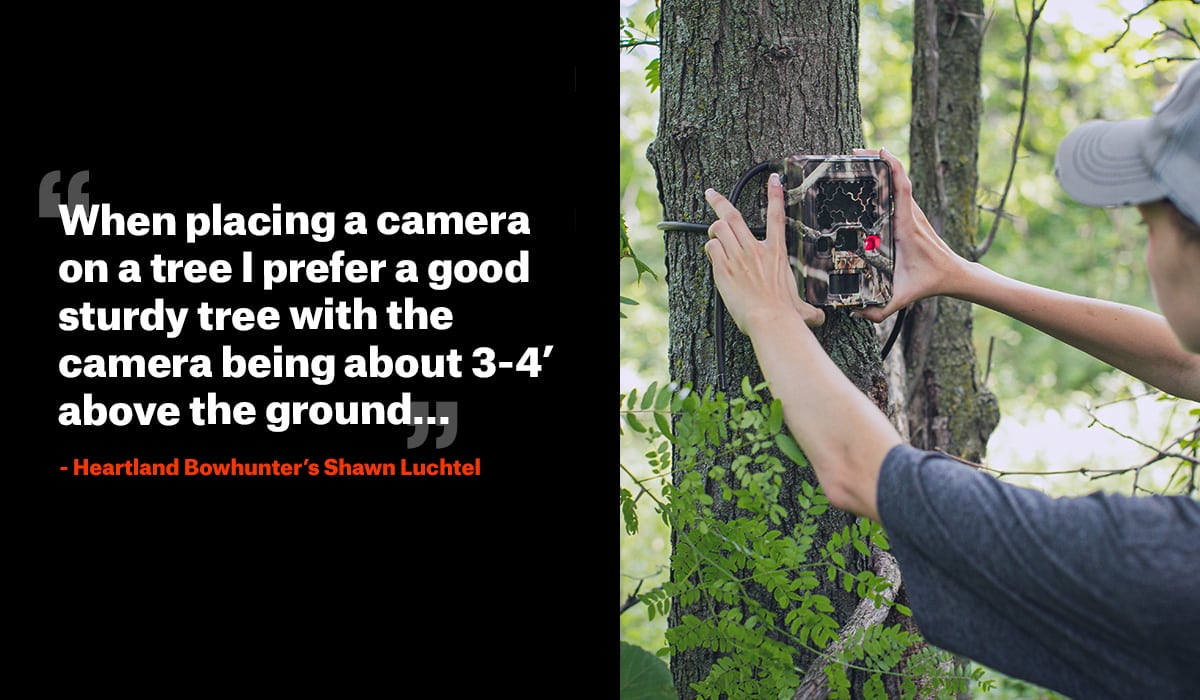
“I prefer a good sturdy tree with the camera being about 3-4’ above the ground. I want the camera to be eye level with the deer when taking photos. I make sure all debris is cleared to avoid any false triggers. If a camera has the video option I almost always prefer it as I get a better idea of a deer’s travel patterns.”
Heartland Bowhunter’s Shawn Luchtel
As Shawn Luchtel suggests, setting up a trail camera three to four feet off the ground works best. However, at this height, there is a risk of making it accessible to would-be thieves. If you’re not hanging the trail camera on high-traffic, publicly accessible trails, you might be safe locking it to a tree at this height, but the best alternative is to use a climbing stick to hang your trail camera 10 feet off the ground and angle it down toward the game trail or food plot.
“Trail camera height depends if I run them on private or public land. Our private land cameras are all chest high, but our public land cameras we either hide better or elevate a good bit and face them down to keep them out of others’ hands and line of sight. Every camera I set, I go where I’m expecting to catch animals and look at the camera to make sure it is aimed well and catches my movement.”
Identical Draw’s Nathan Krick
Trail Camera Orientation
Once you have your trail camera location and decide on the right height, you’ll want to make sure you’re getting the best trail camera pictures possible. This means avoiding lens flare because of interference from the sun. Never point a trail camera due east or west because the sunrise and sunset will often blow out an image. South-facing can also cause problems because it’s in the sun all day. The best tactic is to face your trail cameras north whenever possible.
Get up close and personal with your trail camera photos. Even with the best trail cameras that shoot high megapixel images, your goal should be to have your targets pass within 10 yards of the camera.

“My favorite location for trail cameras is on natural travel routes—areas where the deer move through freely and regularly, where you know deer movement is not influenced by anything. Also, when the bucks begin to lay down scrapes is one of the most exciting times to run cameras.”
Heartland Bowhunter’s Mike Hunsucker
Trail Camera Settings
Too many mistakes are made when it comes to understanding and using the right trail camera settings. Make sure you spend a day with any new trail camera so you know all its capabilities before leaving it in the woods.
Know Your Capture Mode
Are you after photos or videos? Video files are, of course, much bigger and will use more memory, but sometimes that’s what you’re after.
“I always run my cameras on Picture Mode. Only if I have a consistent buck I want video of will I change the camera to video. Helps save storage and battery. I also usually set a 30-second picture interval.”
Identical Draw’s Nathan Krick
Set the Correct Date and Time
Second to the image itself, knowing exactly when that big buck walked by is why we put up trail cameras. Factors like daylight savings and time zones need to be double-checked in your camera settings.
Photo Frequency and Delay
If you are setting your trail camera over a bait or mineral lick, turn your photo frequency down to one to two photos per capture, so you won’t get hundreds of pictures of a deer that is hanging out and feeding.
Turning your delay up to two to five minutes will also help conserve memory card space. If you’re setting up over a game trail, turn up the frequency to two to three photos and delay down to zero so you’re sure you won’t miss that big buck following a whitetail doe.

“Video mode can be very beneficial when setting up a camera on a food plot where deer in the background may be too far away to trigger the camera but when a closer deer triggers the camera, you can scrub the video to identify potential target bucks in the background.”
Heartland Bowhunter’s Mike Hunsucker
Camera Sensitivity
The PIR sensor in a trail camera is responsible for telling the camera when to take a picture, and it is based on motion detection and the temperature difference via infrared heat. When it’s hot outside, there is less of a difference between the ambient temperature and the body temperature of an animal, so you need to set the sensitivity higher. In colder temperatures, you can turn the sensitivity to low, because there is a greater difference in temperature between the animal and the ambient environment. If you are getting a lot of “wind pictures,” where the camera’s motion sensor is picking up on grass blowing in front of the camera, or leaves blowing across a food plot, turn the sensitivity down. When setting up on a field edge or area where the deer might be further away, turn the sensitivity up so you’re able to capture a deer on the edge of the detection zone.
Format Your SD Card for Your Trail Camera
Have you ever pulled a card from your favorite trail camera and popped it into a digital camera or trail camera viewer because you couldn’t wait to see what walked through? Digital cameras and trail cameras read and write data differently. Before you leave your trail camera to do its job, format the SD card.
Use the Best Batteries for Trail Cameras
An estimated 95% of all trail cameras use AA batteries, and one trail camera manufacturer has estimated that hunters burn through 50 million AA batteries every year. With those numbers, it’s tempting to cut costs and use cheap, or rechargeable, batteries. Don’t give in. A non-working camera in the field is worthless. Lithium batteries have been proven to last longer in colder climates than alkaline ones. Alkaline batteries contain water-based electrodes, and as temperatures approach freezing, chemical reactions inside an alkaline battery start slowing down, affecting its performance. Lithium batteries, on the other hand, have been shown to work in temperatures as low as -40°F, and they last up to three times as long as their alkaline counterparts. In terms of efficacy, one set of lithium batteries can collect 20,000+ images as opposed to 7,000 images from a set of alkalines.
Checking Your Trail Camera
It’s hard to wait, but if you want to get the most out of your trail camera placements, you need to have patience and a plan before checking on them. In fact, over-checking cameras is one of the most common mistakes hunters make when using this technology.

“Determining how often and when to check trail cameras can depend on a number of different variables, but typically the most important variable is the location of the camera. Trail cameras that are placed in more intrusive spots such as in the timber on a scrape, or small hidden food plots surrounded by bedding should be checked less often.”
Heartland Bowhunter’s Mike Hunsucker
How and When To Check Trail Cameras
- If you know it’s going to rain, then go. Watching weather forecasts and waiting for a good rainstorm is a great tactic because the rain will wash away your scent after you’ve gone in to collect your SD cards.
- If you can’t wait for it to rain, go in the heat of the day. Most deer are active at dawn and dusk. It might be convenient to check on a camera before or after work, but that brings a high risk of scaring away animals for good. Get in and get out while it’s hot.
“When checking my trail cameras I always tend to check them in the middle of the day when deer activity is at a minimum. I almost always access them just like I would a tree stand making sure I have the wind to my advantage. If the wind is blowing towards where I believe the deer are bedded I simply won’t check that trail camera that day.”
Heartland Bowhunter’s Shawn Luchtel
- Cover your scent. Take every precaution with your human scent when checking on your trail cameras, just as you would when you’re going to hunt.
- Think weeks, not days. If you can wait at least two weeks between camera checks, the better.
“There are a few cameras we do not check during the season and leave running the whole time, July through December, if it stays alive. I put cellular cameras in hard to access locations or bedding areas where I could potentially bump deer, and the non-cellular cameras I put in easy to access places or by my tree stands so I can just grab the card when I go in to hunt. January through July I’ll check cameras whenever, but as soon as August hits, I am thinking about wind direction, scent control, and precipitation if I have to go check cameras.”
Identical Draw’s Nathan Krick
Integrate Your Trail Camera With the onX Hunt App
Managing your trail cameras is simplified with the onX Hunt App trail cam integration. We have partnered with several trail camera manufacturers so you can transfer images, information, and location directly to the Hunt App to manage it all from one place.
Follow along with Jared in the video below to learn how to use the trail cam integration.