You have waited your whole life to have your own hunting spot and now you do. Whether it’s newly gained permission, a new lease, or you sacrificed and bought your own ground, here is where the fun really starts. Making your ground all it can be will take some organization and planning. With the onX Hunt App you can visualize your property from the palm of your hand. Check out these features to make planning and executing your management plans efficient and fun.
1. Recognizing Land Boundaries
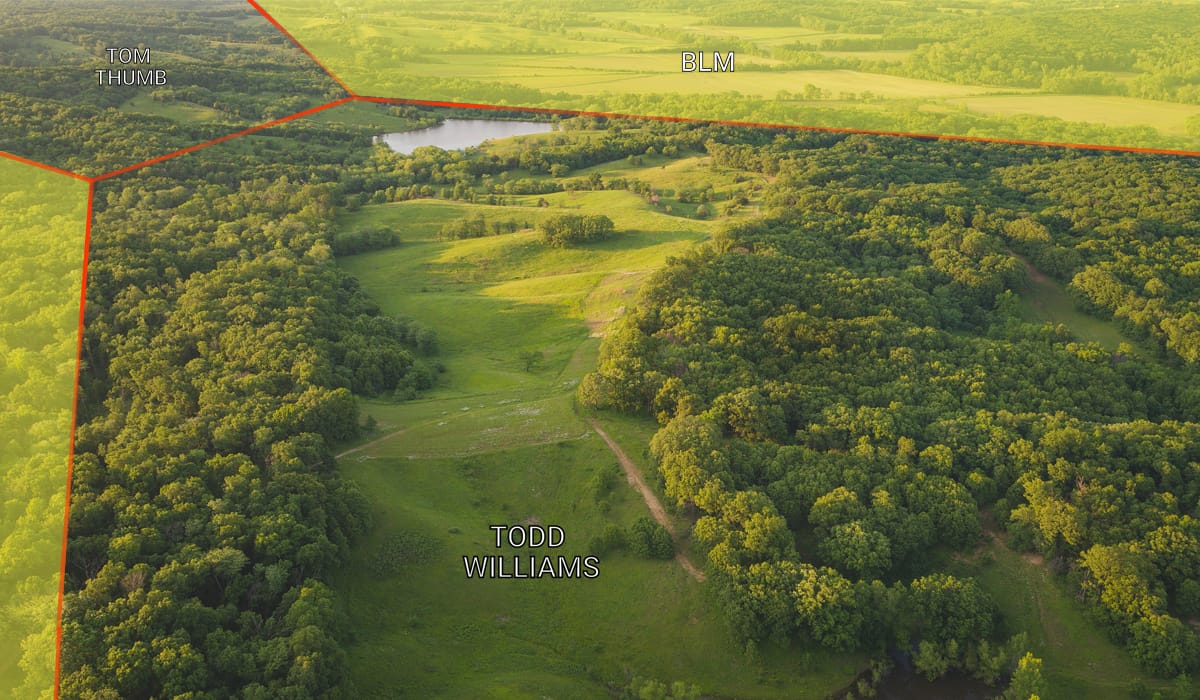
The first step to organizing your new place begins with knowing your boundary lines. The old adage that good fences make good neighbors may be a little strong, but knowing what and who should go where is important. As a new steward of a piece of ground, learning where you and your neighbors should and shouldn’t be is the first priority.
Safety is goal #1 and in big tracts of timber, property lines aren’t always easily identifiable. Sometimes folks end up hunting on or over a property line just out of ignorance or “because they’ve always done it that way.” It may be necessary to hang a few “No Hunting” signs along boundaries to let everyone know where the line is and that there’s a new kid in town. To help keep us on the straight and narrow with this process, onX shows you the private and public property lines by simply turning on that layer.
2. Laying Out the Game Plan
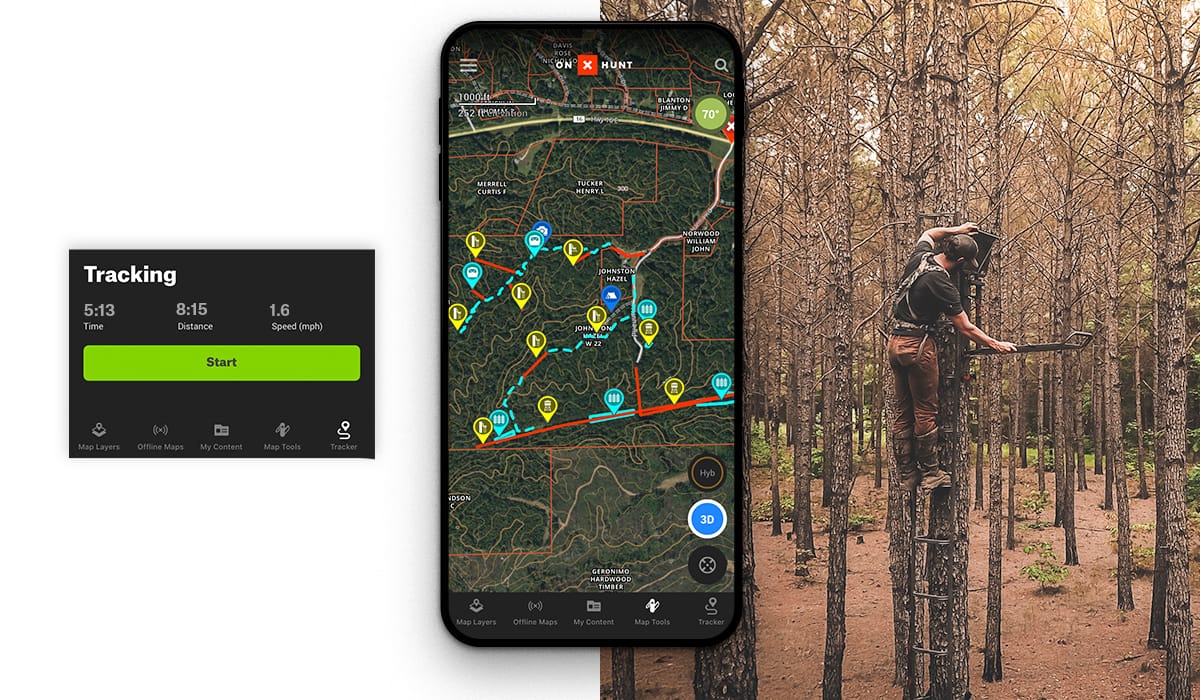
After walking all the property lines and getting comfortable with the lay of the land, you can use the Hybrid Map Layer (aerial photos with topographic lines) to lay out your scouting plan. The aerial feature will help you see transition lines between different aged timber, timber and old fields, or different species of timber transitions between hardwoods and pines. Remember to check the aerial maps of adjoining properties, as the same features mentioned above may interact with your property.
In today’s world, larger tracts of land are being broken into smaller and smaller pieces. Looking at the topo lines on the Hybrid Basemap, you may find a good-looking ridge that runs past the property line. When scouting the south side of that ridge you may find a great trail. Though you can’t ethically follow that trail onto your neighbor’s property, onX Hunt’s Aerial Imagery can help you understand if that’s an open woods travel trail (does/yearling during daylight) or “the trail” coming out of a young timber stand (likely bedding area) that may be just out of sight on the neighboring property. This may be a prime spot to intercept a target buck.
3. Makin’ Tracks: Get Around Your Ground
Getting around your ground efficiently is one of the most important things to figure out to make the most of your hunts. Let’s say you signed on the line for a new lease in April. You may want to be chasing a turkey within a few days. If you took the App out and walked or rode all your main roads and trails while looking at the lease you are way ahead of the game. Seeing those roads and trails on a map really brings the map to life. The first morning you are there waiting on gray light, when he gobbles, you will know how to get to him as quickly and quietly as possible. When you hear that first gobble, soak it in. Then, pull out your onX App and, even in a solid block of timber, literally see which road will lead to success.
4. Drop Waypoints on Sign
I have come to see Waypoints as an indispensable tool. Like working a puzzle, the ground we hunt is a picture formed by pieces of the puzzle. While scouting you should be marking trails, deer bedding, old scrapes, and rubs. If you find a couple of particularly large rubs in a given area be sure to mark them. By themselves, they may only communicate that a mature deer has passed through an area. However, finding a couple of similar rubs in three or four seemingly unrelated areas and marking their specific locations on a map begins to clarify an image of what a particular mature buck or bucks may be doing while on your property.
While some bucks leave clear rub lines, other bucks may leave certain size rubs in or near certain types of cover that they feel most comfortable in. While large rubs in open woods may mean a buck traveled through at night, seeing multiple large rub clusters on the map may tip us off that the clusters consistently show up on the downwind side of high stem count areas. The App makes it easy to drop Waypoints on the rubs, trails bucks may be using, or thicker bedding areas bucks may be holding in while checking for hot does during daylight hours.
Since you now have core areas to hunt, it’s time to find a couple of good trees in which to hang stands. Using your Hybrid map, look for any spot where changes in cover create a type of edge. If those edges intersect with terrain features like creeks, points of ridges, or saddles, you are likely in a money spot. Then look for multiple good trees in the area.
Why find a couple of trees in different spots? As you consider that deer can move around based on wind direction, time of day, and travel to and from feeding areas, you will see the need for more than one tree. Mark that location with a Waypoint. If it’s a while until the season starts, you can easily find that spot again when you need to.
Lastly, hang a couple of cameras to verify your scouting. Be sure to mark those camera spots with a Waypoint as well. If you have a good enough friend, share those camera spots for them to check cards for you if you can’t get back to the property quickly. If entrance and exit to the camera is tricky, use the Tracking feature to mark the way in and out to keep deer in the dark, and then share that track with your friend.
5. Shaping Up Your Property
Nearly every property gives us the opportunity to improve it and our hunting in some way. I use the Area Shape Tool as a “personal trainer,” of sorts, to provide some accountability toward organizing, developing, and tracking my property improvement strategy. Using the App to provide a visual representation of what exists in my mind is a great way to leverage the small cost of the App toward strategically accomplishing goals. It has become my personal land management trainer.
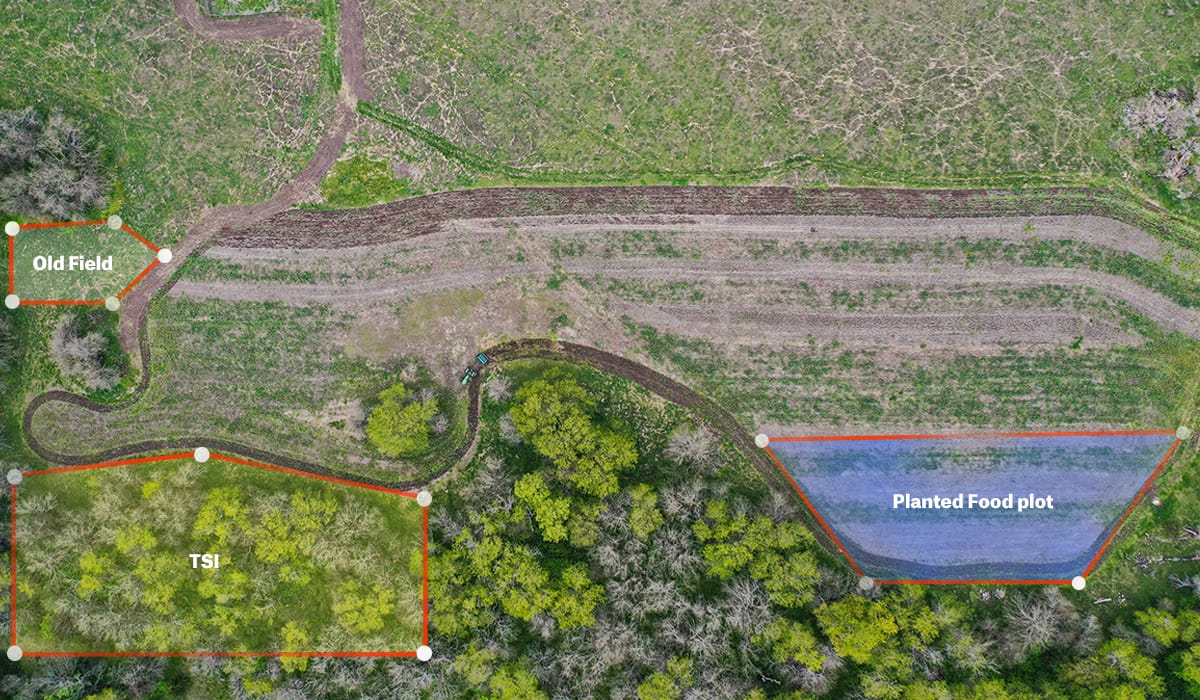
While land management is a ton of fun, it also requires commitment, work, and resources. I have found that I am more likely to complete a management task if I “write it” on the App, i.e., designing food plots, strategically placing them in the best areas, or defining a specific and manageable number of acres of native browse to enhance through TSI or hinge cutting. Placing the shapes of those areas on the map and using the notes section to write out the steps to complete the project gives me a well-organized plan of attack.
So, practically speaking, at this point, we know our boundaries. We’ve done some serious scouting. We can see our roads and trails to know how to access areas most efficiently.
We are ready to build some food plots.
A couple of practical food plot creation considerations are how plot placement and human pressure impact deer movement. Regarding plot placement, if possible, I want planted plots in areas that provide protected access to that food for the deer, but also protected access and opportunity to reach a given stand as I move to and away from the stand locations.
The Area Shape Tool lets us design a plot in a brushy overgrown field or in the old loading deck from a timber cut in a way that may help deer feel most comfortable while accessing the food source and while feeding. Proper location also helps me determine the best spots to intercept deer as they travel to food or enter the plot. The distance a deer travels from cover to food is different from stand to stand and property to property. That distance is a big factor in where I will hang and hunt. If bedding cover ends up being directly adjacent to the plot, I may have to hang a stand on or very near the plot. However, if I was able to create a little distance by where I located the plot it is often better to intercept deer traveling from bed to feed to protect the sanctity of the food source.
Whether hunting very near food or travel corridors between food and bedding, in each case designing the shape of a plot and where the food will be helps me enhance the best access to get in and get out in a way that preserves the property in the most undisturbed way.
Lastly, using the same tool we can determine the exact acreage we want or at a minimum what we will end up with when the work is done. This step is important to ensure we buy the correct seed and fertilizer per plot which saves us time and money. It also helps to make sure we don’t overseed or over-fertilize, which can cause overcrowding with seeds or have the fertilizer burn up the new greens we just worked so hard to plant.
After following the steps outlined above, you’ll have a clearer picture of a well-laid-out hunting property. All that follows is making the most out of your Waypoints, food plots, Tracks, boundaries, and defined hunting areas. Then the only Waypoint left to mark is where your mature buck fell this fall.