What differentiates a seasoned elk hunter from a novice elk hunter?
Is it the number of miles under their boots? The number of stories told across a kitchen counter? How many arrows they’ve flung into foam? How about the amount of deadfall they’ve face-planted over on a pack out?
The differences between highly proficient elk hunters and those still learning the ropes can be found in every aspect of hunting, including, and maybe especially, e-scouting.
In this article, Cody Rich shares how he uses onX Hunt to e-scout for elk, including the features he finds most useful and his step-by-step process for creating Plans A, B, and C.
If you’re fine-tuning your elk e-scouting, read on to steal the parts you like for your own system.
Elk E-Scouting Tools
When e-scouting for elk, we all want to jump into onX Hunt and start scouring a unit. But, before you dive in, take a moment to inventory and understand your tools so all your elk e-scouting efforts build upon an organized foundation.
This section covers the onX Hunt capabilities we’ll be using.

![]()
Folder System
Under My Content, create folders for the following aspects (and any others you find helpful):
- Unit
- Areas of Interest
- Access Points
- Routes
- Camp Locations
- Glassing Points
- Water Sources
- Food Sources
- Bedding Areas
- Edge Habitat
- Critters
By creating dedicated folders for various e-scouting elements, you can categorize and take bulk actions on your content. For example, once you create a folder for “Water Sources,” you can hide all content related to water sources in a few taps. When you’re doing a lot of e-scouting, your map can fill up quickly. Don’t underestimate the value of being able to “toggle” content on and off.
![]()
Area Shape
Think of the Area Shape tool as a literal highlighter—use it just as you would on a paper map. Select Area Shape under “Tools” and highlight promising features: drainages, benches, edge habitat, knobs, etc. Use different colors to differentiate areas. Maybe glassing knobs are orange and elk-y drainages are green.
![]()
Color Waypoints
Color-coding your Waypoints allows you to see patterns in an area. For example, if you always use a brown Waypoint to indicate elk you’ve seen, then over time, you can scan the map for brown to quickly assess areas likely to be elk-y.
![]()
Map Layers
Diving into each Map Layer is beyond the scope of this article (there are hundreds), but it’s worth taking a few minutes to pop open Hunt Map Layers and explore what’s available to you, from motorized trails and hunt units, to historic wildfires and roadless areas.
![]()
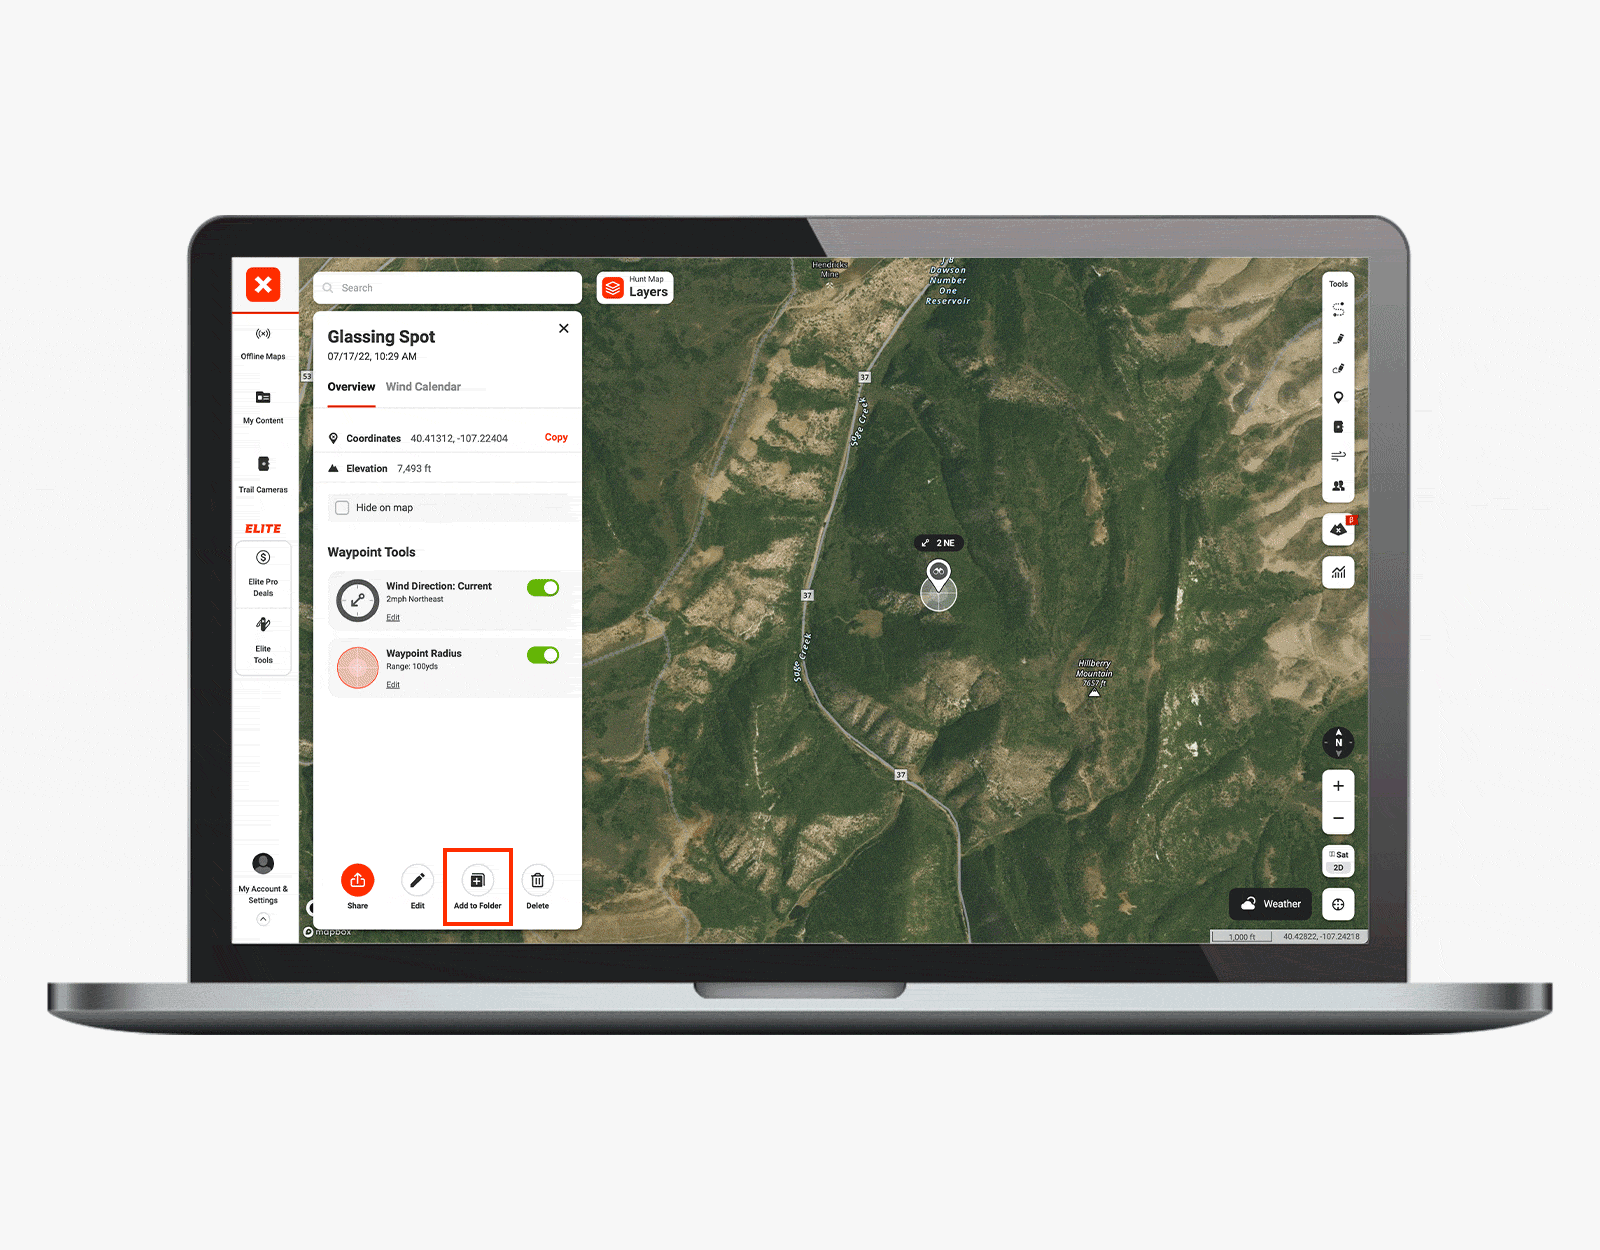
Waypoint Radius
If you have certain parameters such as not wanting to tag an elk more than three miles from an access point, save a Waypoint where you plan to park. Then, tap back into the Waypoint and scroll to Waypoint Tools to set the Waypoint Radius to three miles. Or, to get a perspective on areas likely to be inundated with other hunters, place Waypoints at various pullouts and trailheads you’re considering using and set a Waypoint Radius of 1 mile. You can also put a Waypoint on your glassing locations and set a Waypoint Radius of 400 yards (or whatever suits you) to visualize your effective shooting range.
Tool Tip: Place one finger on the map and hold for a shortcut to dropping a Waypoint.
![]()
![]()
Line Tool & Route Builder
Both the Line Tool and Route Builder measure distances and elevation so you can plan routes, whether it be your driving route, the path you’ll take to camp, how you’ll get to glassing knobs, or the fastest way back to your truck. When building routes, switch to the Topo Basemap for a clearer view. And, just like for other map markups, you can categorize what different lines mean by color. For example, you can use one color to indicate routes that will be driven and another to show footpaths.
Tool Tip: Place two fingers on the map and hold to see the distance between any two points.

TerrainX
Available to Elite Members, TerrainX offers advanced terrain analytics. Here are a few TerrainX components and how they help you e-scout for elk:
- Slope Angle: Knowing elk gravitate toward 10-30 degree slopes during the rut, you can set your desired slope angle and TerrainX will highlight areas that meet that criteria.
- Slope Aspect: You can set your desired slope aspect, which is especially helpful for late season when you want to focus on north-facing slopes.
- Elevation Band: Helpful in late season, you can set the elevation band below the snow line. Or, since it’s inefficient to climb more than 2,000 feet a day, set your elevation band between, say, 6,000 to 8,000 feet to help ensure you stay within a certain range.
- Viewshed: TerrainX’s viewshed allows you to move along a ridge and see what you’ll see from different vantages—a good way to find optimal glassing points. Also, you can run the viewshed along your planned route so you can understand where you might want to stop and glass on your way up.
Building an Elk Hunting Plan
In this section, learn how to break your e-scouting into phases to make it more manageable. If you’re a seasoned hunter, perhaps you’ll gain a tip or two. If you’re a new hunter, you’ll walk away with an entire e-scouting system you can refine for years to come.
E-Scouting Phase 1: Find Unit(s)
What unit do you want to hunt? Find a balance of good access, good elk populations, and relatively lower hunting pressure. Consider:
- Personal Preference: What type of hunt do you want? For example, do you want to truck camp? Do you want to horseback hunt? Do you want to be remote?
- Security: When you look at a unit, are there pockets where elk can hide? If you see a ton of roads, there might not be enough security for elk to want to be there. On the flip side, if there’s private land nearby, the elk might feel less pressured and behave differently.
- Historical Data: If you’re looking for a 6-point bull, population matters. You need to find a balance between elk population estimates and historical tag numbers (hunting pressure).
E-Scouting Phase 2: Find Area(s)
Once you’ve narrowed it down to a unit you want to hunt, key in on specific areas within the unit. You only have so many days to hunt. Choosing the wrong area is the difference between a full freezer and tag soup. Consider:
- Hunting Style: What’s your preferred hunting style? Are you a caller? Do you prefer spot and stalk? A bit of both? Does your strategy involve ambush hunting over a water source? Your hunting style will affect which specific features you’re looking for in an area. Callers want good access and mobility combined with thick timber and north faces. Spot and stalk hunters want glassing knobs and ridge systems. Those who like to spike out are looking for good trails, remote pockets with edge habitat, and travel corridors.
- Mobility: How far are you willing to pack out? Are you using a horse, bike, ATV, or boat, or will you be on foot? Your mobility will affect which areas are realistic for you.
- Elk Habitat: Of course, you also need to look for areas where elk might be: edge habitat, burns, and elevation. Try calling a biologist and ask what elevation band they’re seeing elk at in September. Ask about wintering ground recovery to understand which end of the unit might have better elk numbers.
E-Scouting Phase 3: Find Drainage(s)
After you’ve carved out a few areas of interest, go one step further by identifying promising drainages. Consider:
- Huntability: Is the terrain huntable and does it match your hunting style? Think about efficiency: Look for drainages you can stitch together so you don’t waste a ton of time hopping spots if you have to move onto Plans B, C, or D.
Your hunting style will affect which features you’re looking for in an area. Callers want good access and mobility combined with thick timber and north faces.
How To E-Scout for Elk
Now that you’ve got your organization and potential areas carved out, it’s time to put the pieces together. Below, Cody shares his step-by-step process for e-scouting elk.
E-Scouting Steps
Creating a Rough Draft
- Tap “Hunt Map Layers” and turn on “Motorized Roads and Trails” (under “Roads, Trails, & Rec”) and “Historic Wildfire” (under “Trees, Crops, & Soil”).
- Open “Basemaps” (right side of your screen), switch to Satellite, and toggle to 3D. Adjust your map to a 45-degree angle so you can see topography well. Tooltip: On desktop, hold control and click to tilt the map; on mobile, slide two fingers up and down to tilt.
- Open “Tools” and select “Area Shape.” Highlight the following areas, without worrying too much about remoteness or access just yet:
- Edge habitat
- Mellow slopes
- North slopes
- Roadless areas (Tooltip: There’s a Map Layer for this under “Roads, Trails, & Rec)
- Zoom out and see if the highlighted areas have any patterns.
- Begin organizing your map markups into folders. Select any Area Shape and then select “Add to Folder,” selecting the “Areas of Interest” folder you made at the beginning of this process.
- Use Waypoints to mark glassing points and add them to a “Glassing Points” folder. Use TerrainX’s viewshed to expedite locating good glassing knobs.
- Identify access points and add those Waypoints to your “Access Points” folder. Remember to use Waypoint Radius to help you visualize distances.
- Find bedding areas and add those Waypoints to your “Bedding Areas” folder. Switch your Basemap to the Topo Map and focus on north-facing benches.
- If water is scarce, keep Topo on and look for water (i.e. blue spots or blue symbols labeled “Spring” or “Stock Tank”). Then, turn on Satellite to find cattle trails; follow them to see if they end at a water source.
- Open “Tools” and select “Build Route” or “Line Distance” to begin building routes. For example, use either tool to figure out how far in your glassing points are. Once you’ve built routes, be sure to look at the elevations to confirm the amount of ascending and descending fits your plans. Add your routes to a “Routes” folder.
- Choose your campsite(s). Efficiency should be the top consideration. Choosing a camp is a matter of how mobile you want to be. Put Waypoints on the spots you like and then add them to your “Camp Locations” folder.

Tooltip: Organize your map markups into folders. Select any Area Shape and then choose “Add to Folder.”
Honing the Plan
With your rough draft documented, move on to refinement.
- Zoom out and think about routing more seriously. How will you slip in and out of areas? Think about:
- Accessing Multiple Areas Efficiently: Can you avoid having to drive around the whole mountain? For example, if you have three Glassing Point Waypoints near one another, do you see a way to get to all three from the same access point? Use Line Distance or Route Builder to map how far in each glassing point is and compare distances and elevations from various access points. Choose the most efficient one.
- Avoiding Travel Corridors: Do you see any saddles on your map that elk may be using? Make note of those via the Line Distance tool so you can easily avoid them while route planning.
- Take Advantage of Trails: Navigating ridges and sidehilling is certainly part of the game, but trails are always the fastest option. Document any trails you can use to get from point A to B quickly or use as a time-efficient way to get a better look at creek bottoms, meadows, water sources, etc.
- Plan two or three routes that cover your drainage of interest well enough to where, once you’re ground-scouting, you can quickly understand whether elk are there or not.
- Mentally denote your first priority for your scouting trip: Maybe one glassing point sits higher than the others. Make a note of heading there first.
Repeat
Use the process described above for at least two other areas in the unit you’ll be hunting (i.e. make your Plans B and C). Having multiple plans documented in the Hunt App will save you from expending unnecessary mental energy in the field when it’s time to pivot.
Tooltip: If you need more “room” on your mobile device, tap the onX Hunt logo to open full screen.
Closing Thoughts
Having an e-scouting system allows you to efficiently move onto Plan B, C, or D once you’re in the field. Take the pieces of Cody’s system you found most useful and build on them each year. With consistent practice, your e-scouting skills will become a valuable asset in your hunting toolkit.