
Chapter 3 – Scouting and Sign
Overview
Finding and reading turkey sign is a skill that takes years of experience to hone. In this chapter, we help you shorten the learning curve by breaking down different types of sign such as tracks, scat, scratching, and strut marks. We also explain how to determine if the sign was left by a hen or gobbler.
You’ll learn what to look for on a map to find more turkeys, including habitat diversity and topographic features. Chapter 3 will help you understand which onX Hunt map layers and tools are most useful for turkey hunting so you can confidently develop a strategy before you ever set foot in the woods.
Course
With tips for e-scouting and boots-on-the-ground scouting, this chapter will help you distinguish gobbler from hen sign, understand what certain types of turkey sign mean, and effectively use the Hunt App in the woods. We discuss:
- Tracks, Scratching, Scat, and Strut Marks.
- Locating Turkey Habitat and Using Topography to Your Advantage.
- Pinpointing Gobblers With Compass Mode.
- Understanding the Terrain With 3D.
- Seeing the Landscape Change With Recent Imagery.
Get Access to More Courses
We’re gifting turkey hunters with Turkey Academy so they can prep for the season. For full access to other Elite Expert Resources covering topics ranging from shed hunting to marksmanship, become an onX Hunt Elite Member.
Chapter 3 – Scouting and Sign
Chapter 3 – Scouting and Sign
With tips for e-scouting and boots-on-the-ground scouting, this chapter will help you distinguish gobbler from hen sign, understand what certain types of turkey sign mean, and effectively use the Hunt App in the woods.
Skill Level: Beginner to Intermediate
3.1: Tracks, Scratching, Scat, and Strut Marks
What You’ll Learn:
• How to determine if a track was left by a tom, hen, or jake.
• Why scat is worth paying attention to.
• The importance of strut zones.
3.2: Locate Turkey Habitat and Use Topography to Your Advantage
What You’ll Learn:
• Land features common to turkey habitat.
• Hunt App features to help you be more proficient at finding turkeys, including Hybrid Maps as well as Trees, Crops, and Cover Map Layers.
3.3: Pinpoint More Gobbles
What You’ll Learn:
• How to use Compass Mode to understand exactly where a turkey was standing when he gobbled, allowing you to make an educated setup, giving yourself the best chance at success.
3.4: Understand the Terrain
What You’ll Learn:
• How to use 3D and Elevation Exaggeration to gain a deeper and clearer understanding of the terrain you plan to hunt.
• How you can use 3D Elevation Exaggeration to begin to understand how to read topographic lines.
3.5: See the Landscape Change
What You’ll Learn:
• How to use Recent Imagery to gain a visual understanding of the vegetation and landscape as it changes throughout the year. With an updated aerial image roughly every two weeks, see snow lines melt, water levels rise and fall, clear cuts, and so much more.
Go back to review shotgun patterning or continue to learn about set-up tactics.
Video Transcript
Source: YouTube transcript; please forgive typos.
3.1: Tracks, Scratching, Scat, and Strut Marks
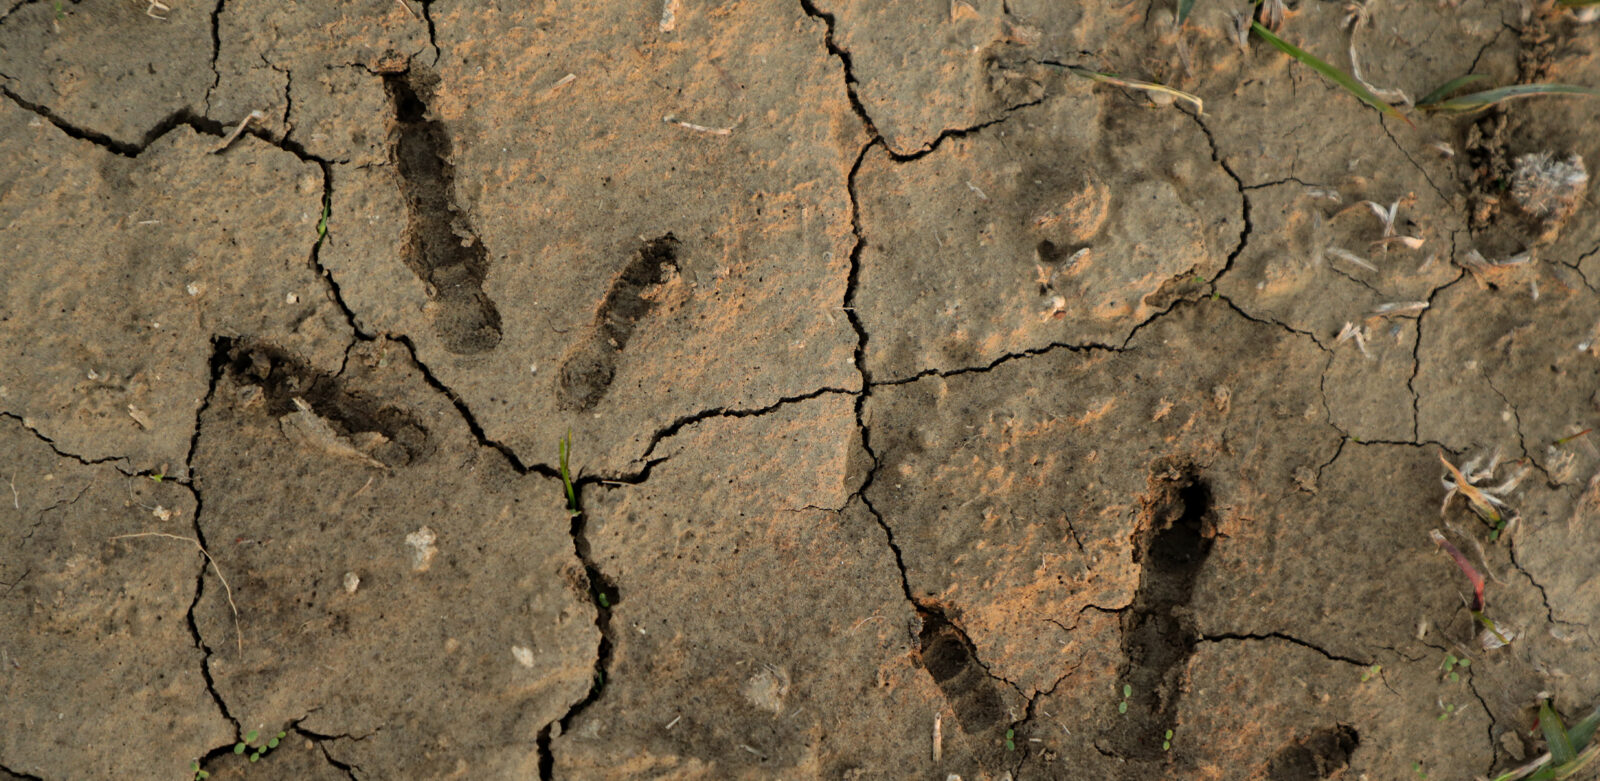
One of the most important things we can do to set ourselves up for success is to make sure we’ve scouted the properties we’re going to hunt. When I start scouting, one of the first things I do is identify the road systems throughout a property. I walk these roads and look for different types of sign, with the most important being tracks. Gobbler tracks are easy to distinguish because they’re longer, usually with a four- or five-inch middle toe and shorter side toes. Hens typically have more even-length toes, while jakes fall somewhere in between, with a slightly longer middle toe. I’m trying to identify how many turkeys are using these roads and open areas.
I’m also looking for scat. Gobbler scat is typically shaped like a J, and that tells me gobblers are feeding in that area. There may be hens nearby, and there’s likely a food source present. That makes it a place worth considering as a setup location because it’s an area turkeys return to in order to meet their feeding needs.
Another sign we look for, especially in wooded areas or places with mast crops, is scratching. This is where gobblers and hens scratch through leaves to find acorns buried underneath. You’ll see raked-up areas with bare ground and leaves pushed together, which shows turkeys have been feeding there.
A gobbler struts by kicking his fan up, puffing his chest out, and dragging his wings on the ground as he moves around. The more he struts, the flatter the ends of his wings become. You can see this sign if you’re looking for it. In dirt or sandy roads, it looks like claw marks, almost like someone dragging their fingers through the ground. If you see multiple drag marks or circular patterns, that could indicate a strut zone. It can be harder to see in the woods, but you can often tell by flipped leaves and disturbed ground.
Strut zones are often slightly elevated areas, sometimes shaded, where a gobbler may spend time during the middle of the day. You’ll usually find a lot of turkey sign nearby. A strut zone is where a gobbler spends a lot of time, and if you find one, find a comfortable place to sit and be patient—because a strut zone is essentially his bedroom.
3.2: Locate Turkey Habitat and Use Topography to Your Advantage
I want to talk about locating turkey habitat, specifically in the Southeast. One mistake a lot of people make is looking at a large block of timber and assuming there must be turkeys somewhere in it. Instead, the goal is to narrow that down and focus on specific areas within that timber where turkeys are more likely to be. Turkeys need a variety of things, and when those needs come together in one place, your chances of finding them go way up. They need trees for roosting, water, food, open areas for strutting and bugging, and nesting habitat for hens and poults.
When I’m looking at a map, especially if I’m hunting a new area, I’ll use a hybrid base map. That gives me topographic lines so I can see elevation changes, along with water features like creeks and drainages. I also use it to identify recent clear-cuts, agricultural fields, or pasture ground. If I see a creek running through an area with an ag field nearby and big timber close, that’s a spot I’ll mark and go check for turkey sign because it offers several things turkeys need in close proximity.
Another thing I look for is timber changes. A very useful layer is the tree species layer, especially the deciduous versus coniferous option. In the South, we have a lot of plantation pine. Turning that layer on helps identify timber edges and creek drainages. I’ve had a lot of success finding turkeys where pines transition into hardwoods. If those pines are managed or burned, they often provide good nesting habitat and attract turkeys. Habitat diversity is key—look for open areas, creeks, drainages, and good roost trees.
In the Midwest, turkeys rely on the same basics: food, water, cover, and roost sites. Using crop data layers can help identify likely food sources. Corn, soybeans, and alfalfa not only provide food but also open areas for turkeys to dry off after rain, strut, and bug. One overlooked habitat type in the Midwest is wetlands. Turkeys often use the edges of wetlands, especially hens, because they provide excellent cover for nesting and raising poults. Combining crop layers, tree species layers, wetlands, and a hybrid base map helps narrow in on productive areas.
Learning how to read topography is one of the most valuable skills you can develop. Satellite imagery alone may look informative, but it doesn’t always show terrain features like ridges and drainages. In areas with steep terrain, knowing where the ridges and creeks are is critical. A hybrid base map shows those features clearly. From a turkey hunting perspective, it helps you understand obstacles between you and a gobbling turkey, such as creeks or multiple ridges. Learning to read topography and using a hybrid base map will give you a much better chance of success during the spring season.
3.3: Pinpoint More Gobbles
I want to teach you how to pinpoint a gobbler’s precise location using the onX Hunt app with compass mode. After you hear a bird gobble, you usually have a good sense of how far away he is just based on how loud he sounds. The first thing you’ll do is tap the crosshairs in the bottom right corner of the screen. That brings you to your current location. If you tap the crosshairs again, a sight cone appears that changes dynamically as you turn your phone. This helps you dial in the exact direction the bird gobbled.
Once that’s active, a compass icon appears in the bottom right corner of the screen. That pulls up a hashed distance overlay on your map. I always like to use the hybrid base map when pinpointing a gobble because the whole purpose is to create the best setup possible before calling the bird in. With compass mode activated and the hybrid base map on, you can start analyzing the terrain using topography and aerial imagery.
If I thought the bird was about 150 to 200 yards away, I can look at the map and see exactly where he’s likely standing—maybe on the edge of a clearcut or in the corner of a field. This allows you to really break down the terrain and understand his position. From there, you can tap the rangefinder icon, which draws a waypoint with a red line that you can drag to adjust distance. If I decide the bird is around 170 yards away, I’ll place the waypoint there and save it.
Now I have that gobbler marked exactly where I believe he was standing, and I can make an educated setup that gives me the best odds of bringing him into gun range. Using compass mode to pinpoint gobblers can make a big difference during the spring season.
3.4: Understand the Terrain
I want to show you one of the useful features in the onX Hunt App for spring turkey hunting: 3D maps and 3D elevation exaggeration. To use it, go to the bottom right corner of the app and tap the base map card. First, select the hybrid map, which gives you aerial imagery along with topographic lines. Then take it a step further and turn on 3D maps. You’ll see the map change slightly. Swipe down out of the base map card, then use two fingers to pan upward, which gives you a landscape-style view across the terrain.
In some areas, you won’t immediately see much 3D effect because the terrain changes are subtle. That’s where elevation exaggeration comes in. In the bottom right corner, you’ll see a slider labeled “el+,” which stands for elevation exaggeration. Sliding that bar up exaggerates the topography that’s already there. A small hill becomes more pronounced, making terrain features easier to recognize.
As you adjust the slider, you can start to understand what the topographic lines represent. A full circle indicates a knob or high point. Two knobs close together with a low area between them indicate a saddle. This feature helps you quickly build a basic understanding of terrain instead of trying to interpret topo lines on your own.
3D elevation exaggeration is especially useful for spotting subtle terrain changes in mostly flat areas, and it can significantly speed up how quickly you understand topography. It’s a great tool to use when preparing for spring turkey season.
3.5: See the Landscape Change
I’m going to explain how you can use recent imagery in the onX Hunt app for spring turkey hunting. You’ll need to be an Elite member to access this feature. I do a lot of hunting in the Midwest and have often found turkeys in swampy wetland areas, as well as similar habitats in Mississippi, Alabama, and North Carolina. Recent imagery is especially valuable for understanding water levels and determining whether you can even access an area, or whether turkeys are likely to be there if water levels are too high.
To use it, tap the base map option in the bottom right corner of the screen. If you’re an Elite member, you’ll see options for leaf-off imagery and recent imagery. Use the slider to turn recent imagery on. Once activated, you’ll also see a date slider in the bottom left corner of the screen that allows you to scroll through different imagery dates. Recent imagery is updated about every two weeks, so you’ll see those time intervals as you move the slider.
For example, you may see a lake in early April still covered in ice, then as you move forward in time, the ice comes off and surrounding lowlands appear very wet. As spring progresses, those areas begin to dry out and green up. By late May, you may see that water has completely receded from low-lying areas. This gives you a clear picture of how conditions are changing over time.
Having this tool is extremely helpful, especially if you’re traveling a long distance to hunt or crossing state lines and don’t have the ability to scout in person. Understanding snow levels, water levels, and overall conditions can open up more places to hunt and more areas to listen for gobbles. Using recent imagery in the onX Hunt app gives you a more complete picture of the area you plan to hunt and helps you be as prepared as possible.
Learn more about the onX Elite Membership.
Don't have an account?