“Where do I go?”
That question can be overwhelming. You can’t throw a dart on a map, jump in the truck, and start hunting. There’s a lot of planning that goes into a successful hunt, and we’ll break down the tools and elements that will have you yelling “Rooster!” more often.
Not all land is created equal, and every time I set out to hunt a new spot, there’s a formula I use to ensure the best odds for success. It all starts with the onX Hunt App, as it is your key to finding not only publicly accessible lands but the ones most likely to hold birds.
Not only is onX Hunt available on your phone but also on the computer, and that’s where we’ll start. I prefer to use the desktop version of onX Hunt as opposed to the App for e-scouting as it gives me a larger screen, making finding the good stuff much easier.
The layers I depend on day in and day out are Private Land, Government Land, and Walk-in Layers. Depending on the state, the private lands open to public hunting layers will be labeled differently based on the program. For example, Kansas’ walk-in access is called WIHA, Iowa is IHAP, North Dakota is PLOTS, and Montana is Block Management. These Layers are invaluable, as they open up a variety of habitat you might not traditionally find on government-owned public lands.
The Big Picture
Now, how do we find birds? If I’m hunting a new state, the first order of business is consulting Pheasants Forever’s Pheasant Hunting Forecast. They do a fantastic job of compiling all the information from state agencies as well as anecdotes from biologists about bird numbers in different areas of the state. It doesn’t matter how good the cover looks. There are just certain areas that are better than others, and this cuts down the learning curve dramatically. Once you have read through the reports, you’ll get an idea about what parts of the state hold birds. Then, it’s time to hit the maps.
The first order of business is finding clusters of public land in the areas you’ve identified from the state reports. The reason? Say you show up to hunt one piece of land and there are already four trucks surrounding it. Now what? You’ve just wasted all that time to drive there, and you continue to burn hunting time driving to the next spot. Finding these clusters essentially gives you a backup plan—and a backup for your backup.
The other reason is that many of the spots may only take an hour or two to walk, and then you’re burning time driving to the next spot. Lastly, just because it looked good on the map doesn’t necessarily mean it is good, and it’s nice to have the option to look at a property on the ground and say, “Nope, not worth my time” and drive five minutes down the road to the next one.

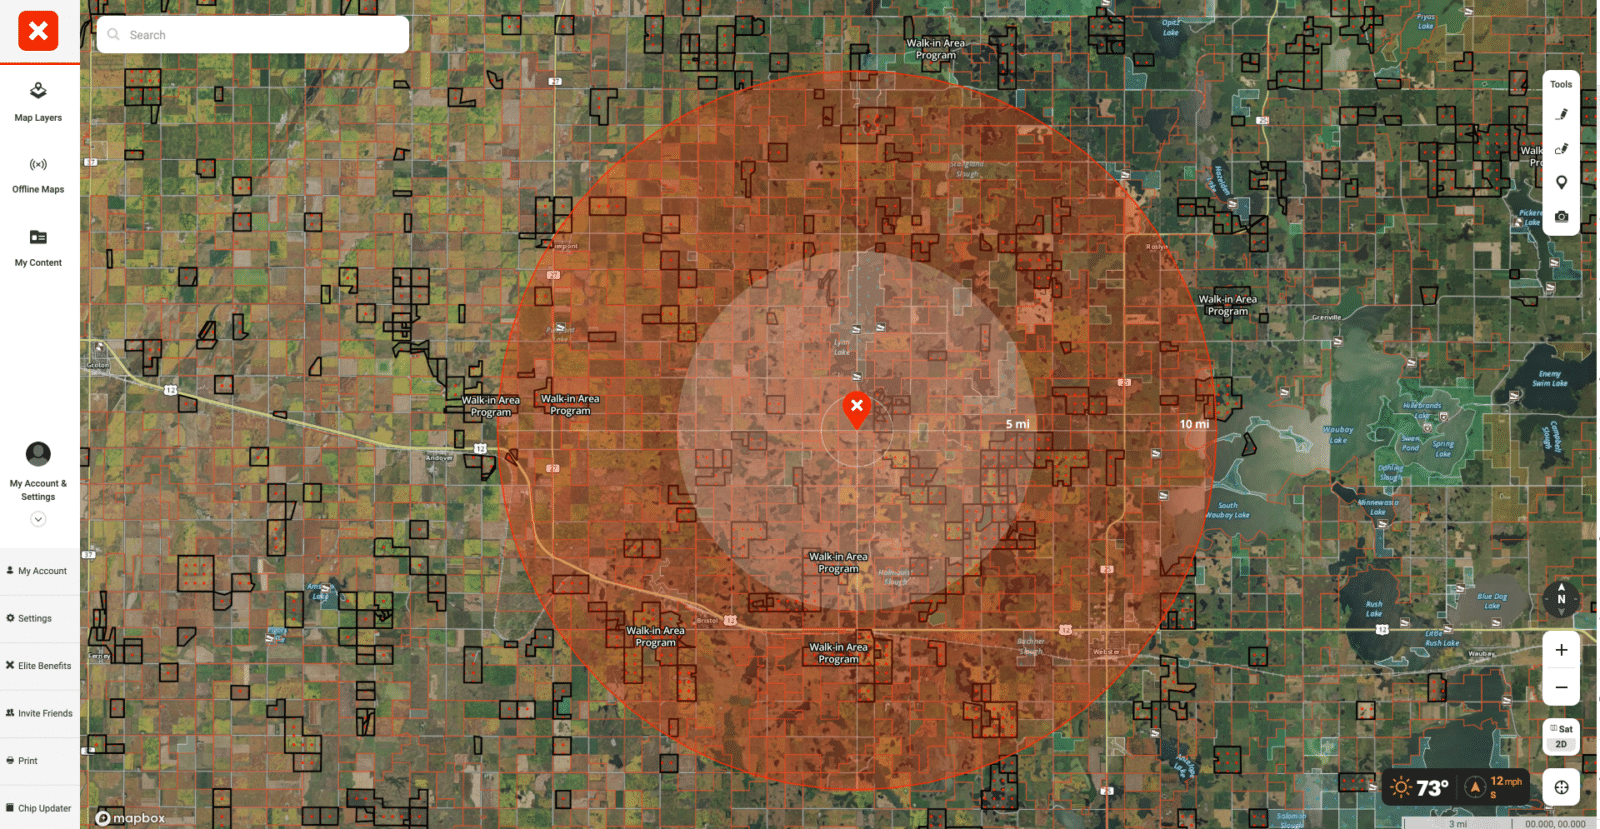
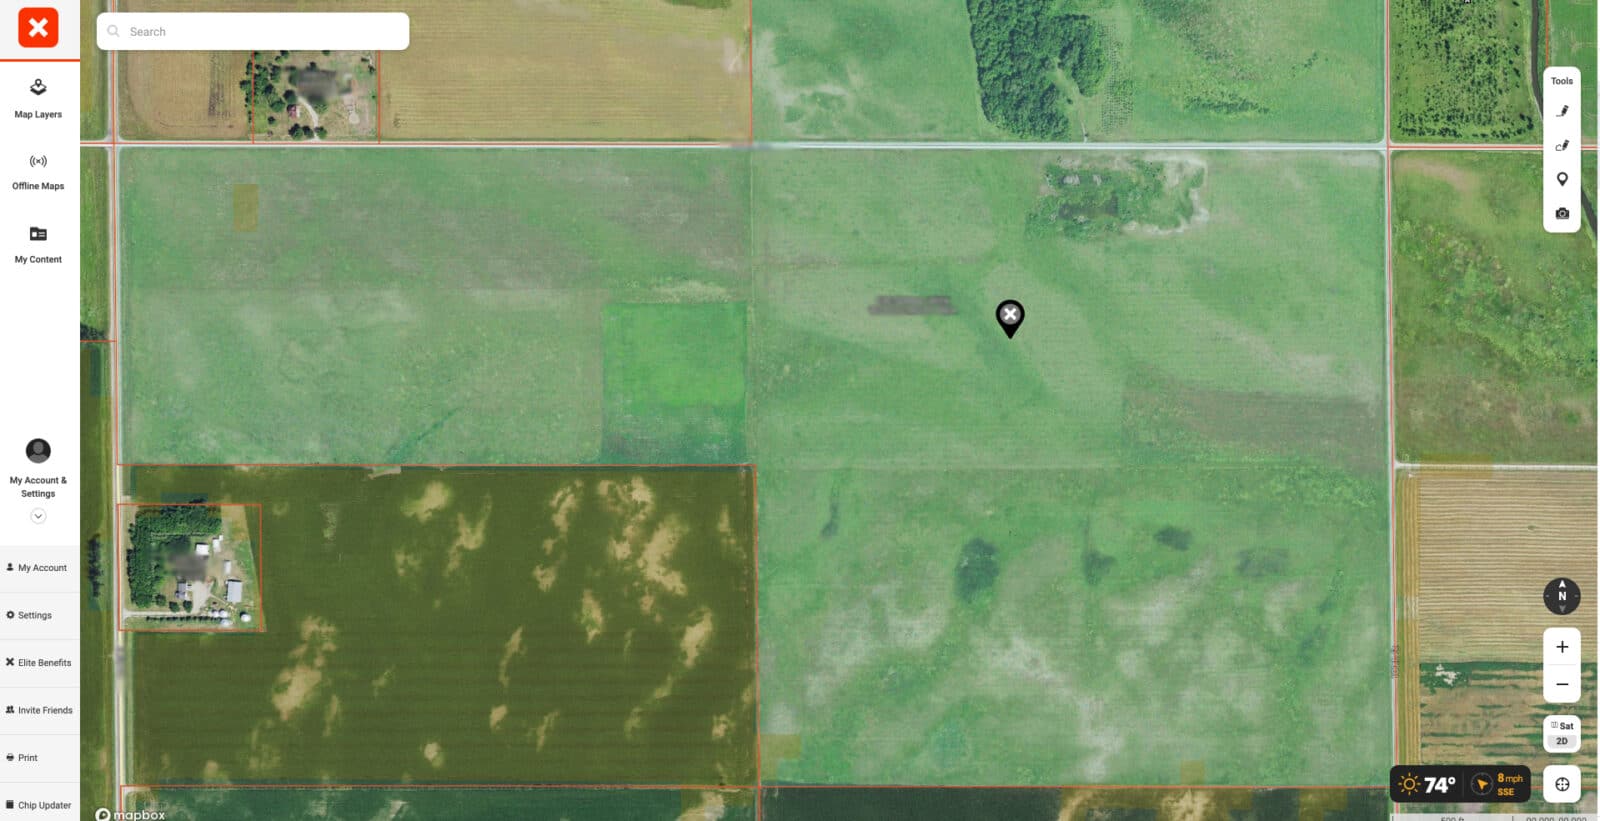
If you take a look at the screenshots above, you’ll see what I’m talking about. Both screenshots are from South Dakota, and the diameter around the Waypoints is 20 miles. The Waypoint in the top screenshot is on a piece of walk-in land, and within 20 miles there are only four other properties. On the other hand, the second screenshot is centered on a piece of walk-in, and it has too many other public pieces surrounding it to count.
Honing In
Once you’ve found a group of properties that look promising, it’s time to dig in and figure out which pieces are worth the walk and which ones you need to drive past. But what does a good property look like? Even more importantly, how do you translate what you’re seeing on aerial imagery to what’s actually on the ground?
This conundrum happened to me when heading out to central Montana for the first time chasing sage grouse. I had no idea what good habitat looked like or where to start. The first place I went to was YouTube. We are so lucky to have limitless resources at our disposal for learning how to hunt different species across the country. With GoPros and other action cameras, the barriers to entry for filming and distributing content have been dramatically reduced. Therefore, I was able to type in ‘Montana Sage Grouse’ and watch hundreds of minutes of footage from where they live.
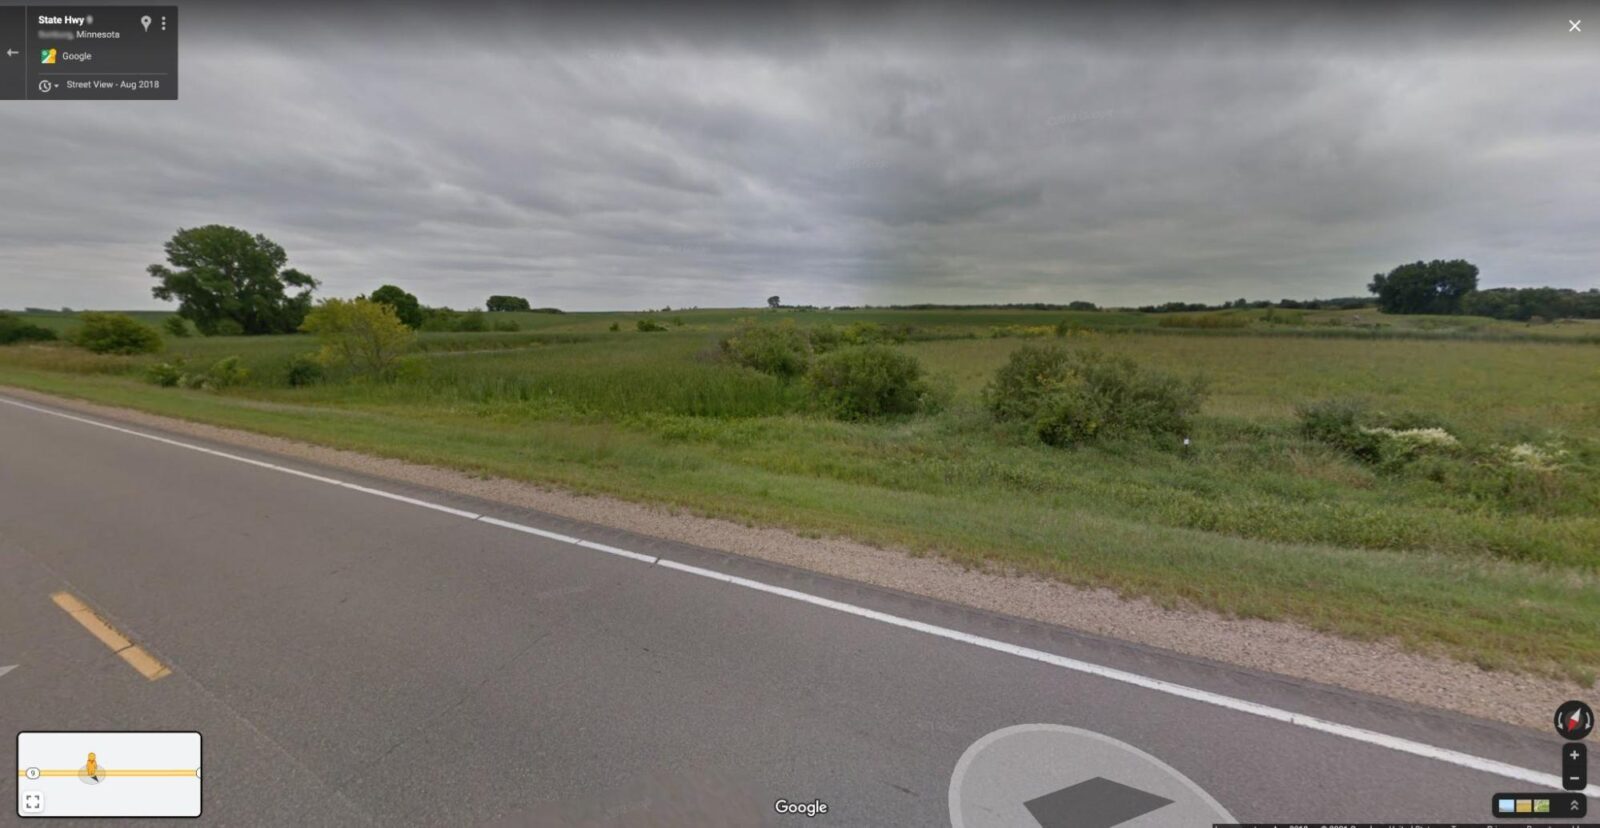
Armed with the knowledge about what habitat looks like, it was time to figure out what it looked like from a satellite view. This is where Google’s Street View on your computer comes in handy. Find a piece of land that looks “birdy” along a main road or highway using Street View. Then you’ll see a little orange man in the bottom right corner of the screen—grab him and drag it onto the road. You know those Google cars with all the cameras on top you’ll see driving around from time to time? They are taking 360-degree photos, and you can access them.
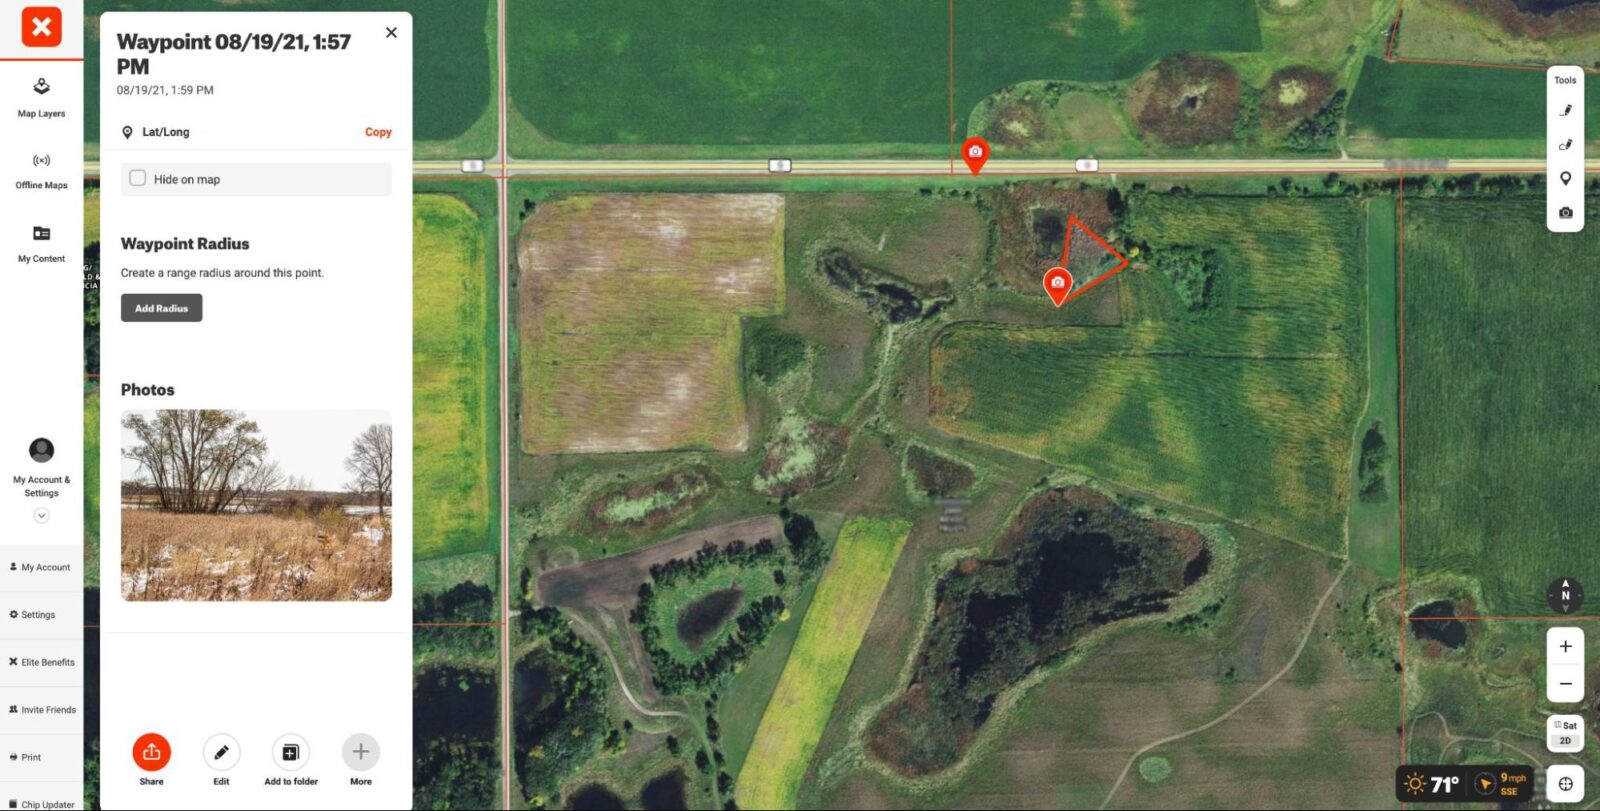
Now you are able to actually see what that habitat looks like on the ground and translate it to aerial imagery. Here’s an example from a late-season pheasant hunt last year on a friend’s piece of property. Below are three photos. The first is a photo of me shooting at a rooster on the edge of the cattails. The second is aerial imagery from onX Hunt of the marsh with a red “camera” icon and field of view pointing in the direction of the photo, and the third is the Google Street View (little orange man) of the property.

Now that you know how to start interpreting maps, it’s time to look at how to break down a specific piece of ground. The number one thing I’m looking for is diversity. What exactly is diversity? For me, it’s a mix of agriculture and different heights of natural vegetation, including native grass, cattails, and maybe even some trees.
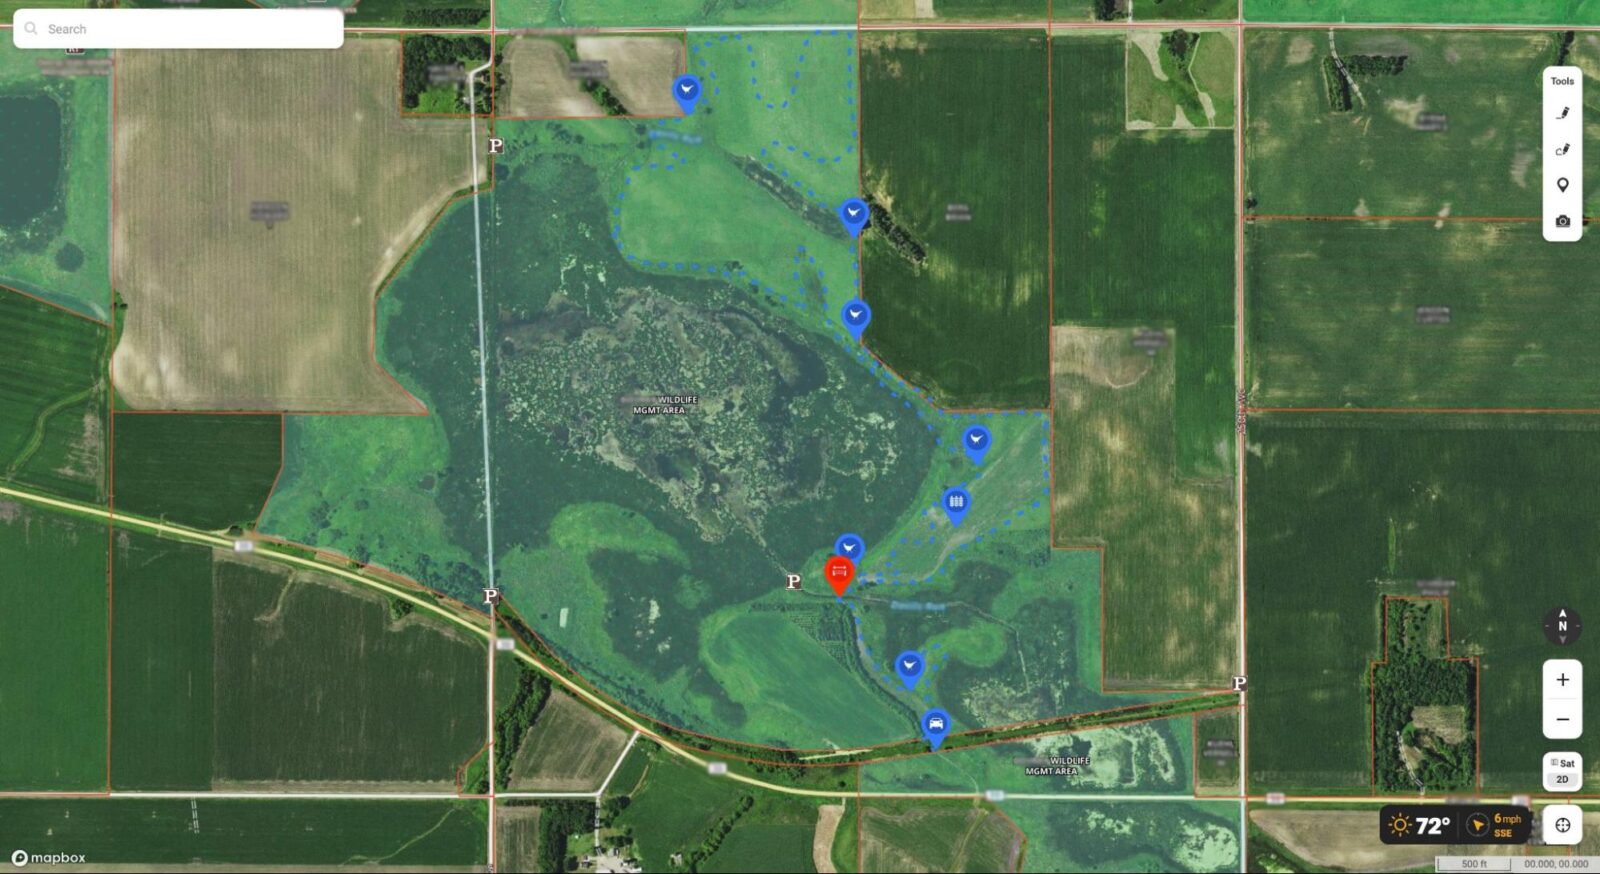
The screenshot above is an example of a piece of land that has great habitat diversity and looks super birdy. If you don’t spend a ton of time looking at aerial maps, the next logical question is how can you tell what’s what? You can go the little orange man on the Google route, but here’s a little cheat sheet.
At the center of this property is a large marsh, with the water being the darkest color and the cattail areas being the darkest green. Generally the thicker the cover, the darker it will be. You can see on the north side of the property where I walked the grass on the aerial imagery almost looks fuzzy. I haven’t found a better way to describe it, but that fuzziness is what I’m looking for to find good native grass. Even throughout the grass, you’ll see its different shades of green shifting to almost tan. The lighter the color, the thinner the grass is likely to be.
Crops are another big consideration, and they aren’t created equal. For pheasants, corn is king. It’s a preferred food source as days start getting colder, and whenever possible I try to hunt fields in close proximity to cut corn. With onX Hunt, you can see what crops were planted where for the previous year. All of this information is in your Layer Library under Crop Distribution. You might be wondering what good it is to know what was planted in the previous year. With a basic understanding of crop rotations in your area, you’ll be able to predict which fields will be planted in what type of crop this season.
In the areas I hunt, corn and soybeans are by and large the most popular crops, so I’ll turn on those layers. If a field is showing it’s been planted in corn last year, the odds of it being planted again this year are slim to none. So I assume this year, those fields will be planted in soybeans. Conversely, if a field is planted in beans, there’s a much better chance it will be corn this year.
Now, if there’s a good piece of cover that happens to be next to beans, it doesn’t mean I won’t hunt it. However, knowing what areas might have corn adjacent will change my game plan for the day. For example, I might go to my best-looking area with corn first thing in the morning in order to beat other hunters, and this is especially true in heavily pressured areas.
If you notice the blue Waypoints with the pheasant icon in the image above, that’s where I had flushed birds on one particular trip. What’s really interesting is every single bird I flushed was on a habitat edge, whether it was on the edge of crops and native grass or on the edge of cattails and native grass. Finding a property with a mosaic of cover and a lot of edges is going to be a winning strategy nine times out of 10.
It’s also helpful to look at a map of what I would consider a less ideal piece of habitat. Yes, this property has crops around it, but barring the marshy-looking area on the south side of the road, there’s little diversity and the lighter coloration of the grass is indicating it’s going to be thinner. Other than hunting around the field edges, it’s just a large swath of grass. Can you find birds there? Probably. However, there’s probably going to be a lot of ground in between each flush.
Looking back at the map of ideal habitat, I could already picture what my ideal walk looked like based on the cover. On the map of less ideal habitat, your guess is as good as mine. If I had to hunt it, I would probably just walk around the edges and hit the little marsh.
Strategies for Early, Mid, and Late Season
Different types of cover lend themselves to better hunts during different seasons. Here’s a quick breakdown of what I’m looking for depending on the time of year.
Early Season
This is a fun time of year to hunt as there’s often an abundance of young birds and the wily veterans haven’t been shot at for months. My key to success this time of year relates to crops and timing. For most years, corn hasn’t been harvested when the opener rolls around, and that gives pheasants the upper hand in the game of hide-and-go-seek. During the days, they’ll be hanging out in the standing crops getting fat and sassy—and avoiding you.
To combat this problem, I’ll be looking for areas that might have soybeans planted around them instead of corn. Beans are normally harvested by the end of September or early October. While not as powerful of a magnet as corn, there are still birds that eat plenty of soybeans.
I’ll also be looking for areas that have some sort of water feature, whether that be a marsh, creek, or lake. The reason for this actually has nothing to do with the birds but the dogs that pursue them. Early season can get hot, and it’s valuable to let your dog take a swim from time to time to cool off.
Do we abandon those perfect spots surrounded by standing corn? Nope, but you have to take a different approach to hunt them. I’ve walked through fields adjacent to standing corn three hours before sunset without flushing a single bird. I then made a quick hot lap less than an hour from sunset and didn’t make it 15 minutes before walking out with my limit. As I was walking back to the truck, there were hundreds of birds pouring back into the grasslands to roost.
So if you have a honey hole, consider hunting it either first thing at sunrise (if legal in your state) or right at sunset. You’ll have a much better chance of catching them before they go to feed.
Mid Season
This is one of my favorite times of year to hunt pheasants. The shine of opening day has worn off, and fewer people seem to be in the field. Deer seasons are opening up and people are more preoccupied with the rut than roosters. This is a perfect time to implement the cut crops strategy we touched on before.
Being that the season has been open for at least a month, the birds have definitely started to feel the pressure and have wised up to the game. This time of year, I will start trying to find areas that might be harder to access because people don’t want to go through the work to get to them. It could be large pieces of property and having to walk miles into them or wading through streams or cattails to get to areas that are untouched.
You can also unpack your bag of tricks. Many pheasant hunters are pretty careless when it comes to accessing a spot, and the smarter birds know the gig is up as soon as a truck pulls into a parking lot.
By picking parking spots that aren’t commonly used, the birds won’t know what hit them. Another trick I like to use is parking 300-500 yards away from the property I want to hunt and walking into the spot. This prevents making a racket while getting out of the truck and letting the dogs out.
Late Season
By this time, many other hunters have hung up their boots and are more concerned with the cold than they are with pheasants. It’s one of the best times to be in the field for this reason. However, the birds are no spring chickens, and their habits have changed out of necessity.
The two biggest driving factors for their decision-making are food and shelter. That means thick cover, such as cattails, tree belts, and thick native prairie. It also means corn is a high priority.
My scouting shifts to looking for areas that have woody cover and marshy areas. However, not all trees and cattails are created equal.
When it comes to frozen sloughs, they can be real late-season magnets. The common mistake I see when people pick out these areas to hunt is they end up picking out cattail complexes that are way too large to effectively cover. It might be a different story if you have 10 people, but if it’s just you and a buddy, you won’t want to bite off that much. My rule of thumb is I won’t hunt swamps more than maybe 150-200 yards wide. Larger than this and I get spread too thin, passing up birds and allowing them to run behind or around me.
Finding the right woody cover is also important. I really like short, dense tree belts as well as willows growing in with grass or cattails. Shelterbelts are great places to find roosters as well, especially when nasty weather rolls in.
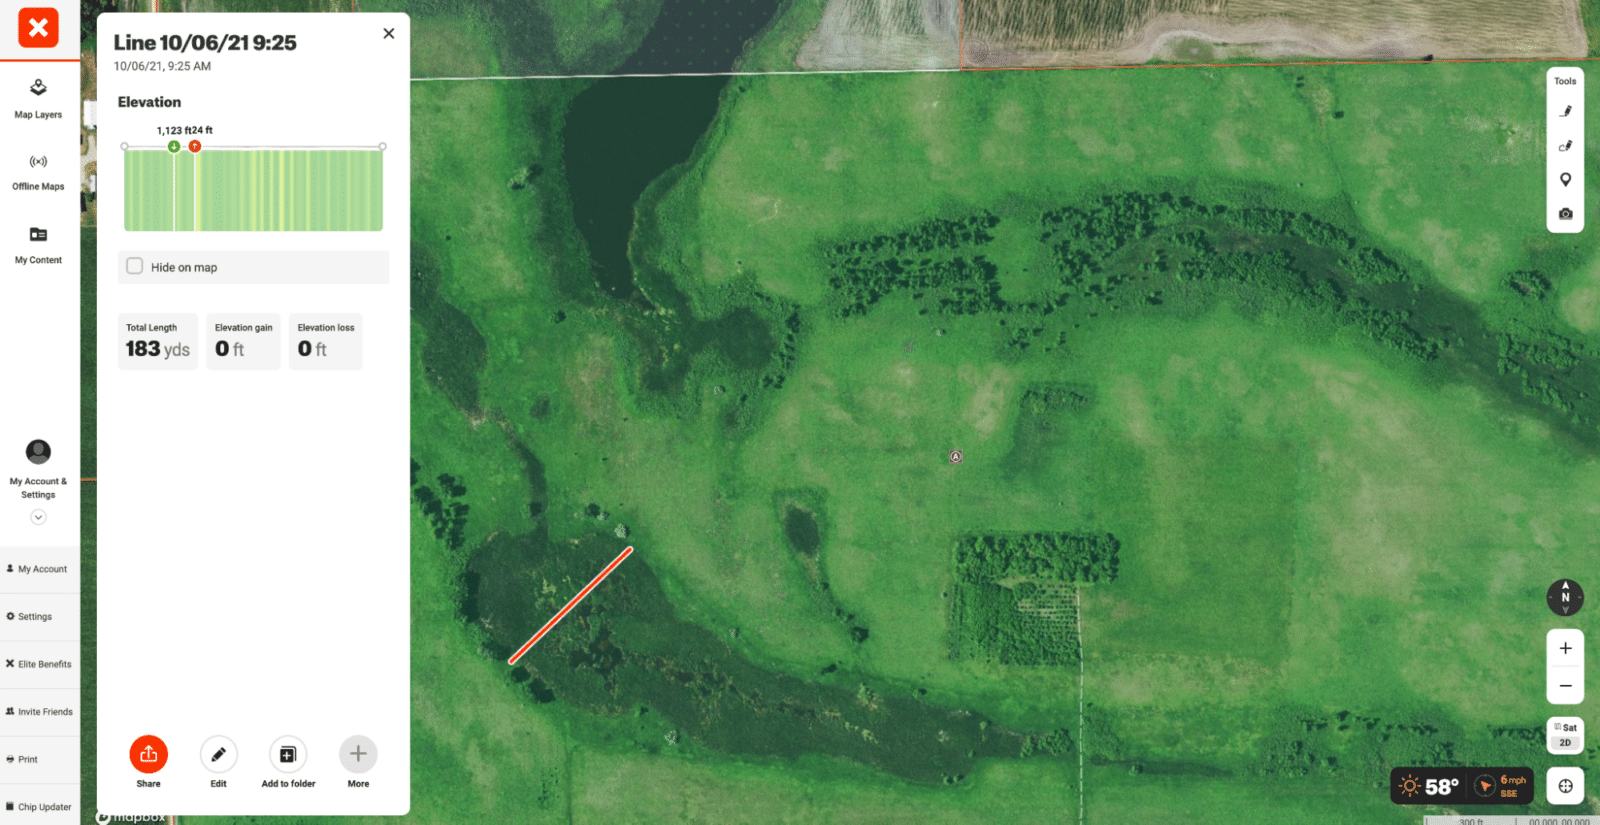
The example above is a great late-season haunt. It has a complex of marshy areas with scattered trees. I use the Line Distance Tool to determine the width of the marsh areas. The one pictured is a little too wide, at 180 yards, but notice how it necks down towards the southeast side. I’m okay with this as I always hunt it from the northwest side, pushing all of the birds down into the skinny areas.
Another thing I look for is a good “flow” to the property. Again, this piece has almost a ring of cattails around it so I can be hunting in prime areas almost the whole time and don’t have to waste effort walking unproductive ground getting to the next spot.
One other great asset is when state agencies plant food plots on public lands. They can be great opening weekend, but shortly after that, birds get wise and know that every single hunter is going to try to hit it. However, when late-season rolls around and temperatures plummet, birds often determine the need for food is worth the safety hazard.
X Marks The Spot
Waypoints are one of the most crucial tools in my bag. I spend countless hours e-scouting for pheasants different areas I may hunt the following year, and without a system of organizing these Waypoints, I’d be hopelessly lost.
Here’s my system for marking Waypoints. When I find a property I’ve scouted online and have never been to, I’ll put a yellow Waypoint with the species icon I’m looking to hunt. So in this case, a yellow pheasant. I’ll also mark the most logical access point in situations where it may be more difficult. I keep in mind the prevailing winds in the fall, north and west, when marking access points so I can effectively hunt my dog into the wind. I’ll also put the truck Waypoint in yellow.
If I find a property that looks ridiculously good online, I’ll make the Waypoint white. I remember it as “white-hot”. If I’m out and about scouting and lay eyes on a property I have scouted and confirm it does have good habitat, I’ll change the color to purple. Finally, if I see birds on a property or successfully hunt it, I’ll leave a blue Waypoint with a pheasant icon.
If I have a bad hunt, because it’s potentially poor cover or don’t see any birds, I don’t just delete the Waypoint because two, three, or even four years down the line, I might make the same mistake again. I’ll turn these Waypoints to black.
I should probably do this more, but when you’re out hunting and flush birds, it’s a good idea to leave a Waypoint. My rationale for this is when I’m looking back, analyzing a hunt, I’m able to glean a ton of information from the location of the finds. When you save a Waypoint, onX Hunt timestamps them, so you not only know where you found birds but what time of the day as well. In addition to marking flushes, utilizing the Tracker tool also gives you valuable post-hunt information about the ground you covered.
This scouting strategy can be used across pheasant country and will consistently help you get into more birds more often. onX Hunt is a proud sponsor of Pheasants Forever, and by using the code PHEASANTS during checkout, you’ll get 20% off your Membership. Then, onX Hunt will donate 20% of your purchase back to Pheasants Forever to help fund the mission of creating more habitat for the birds we all love.

Hunting Regs Without the Hassle
Compliance shouldn’t be the hard part. FieldRegs is a free app from the team behind onX Hunt that helps you quickly find hunting regulations, seasons, and legal requirements without digging through agency websites and PDFs. No credit card required.