It is no secret that digital mapping has absolutely changed the game in hunting. At this point, it’s the new normal and makes us all more efficient hunters. We can now see a detailed layout of the land before and during the hunt, easily navigate to pre-marked Waypoints, and log new spots right when we find them. onX Hunt is a tool that is undeniably worth its weight in gold, and it fits right in your pocket.
These features, though, are just the tip of the iceberg. They sit on the surface and are used by most hunters. But there are even more features to aid in your hunt beneath the surface. Here are some overlooked and underutilized features of the onX Hunt App that have helped me out in the field.
Wind and Weather
This past spring, I found myself scouring my maps in preparation for a spring bear hunt in my home state of Arizona. This is a water-based hunt where ambush hunting would ultimately be what gave way to success, so knowing the wind direction ahead of time was crucial for e-scouting. The Hunt App’s Wind and Weather feature helped immensely.
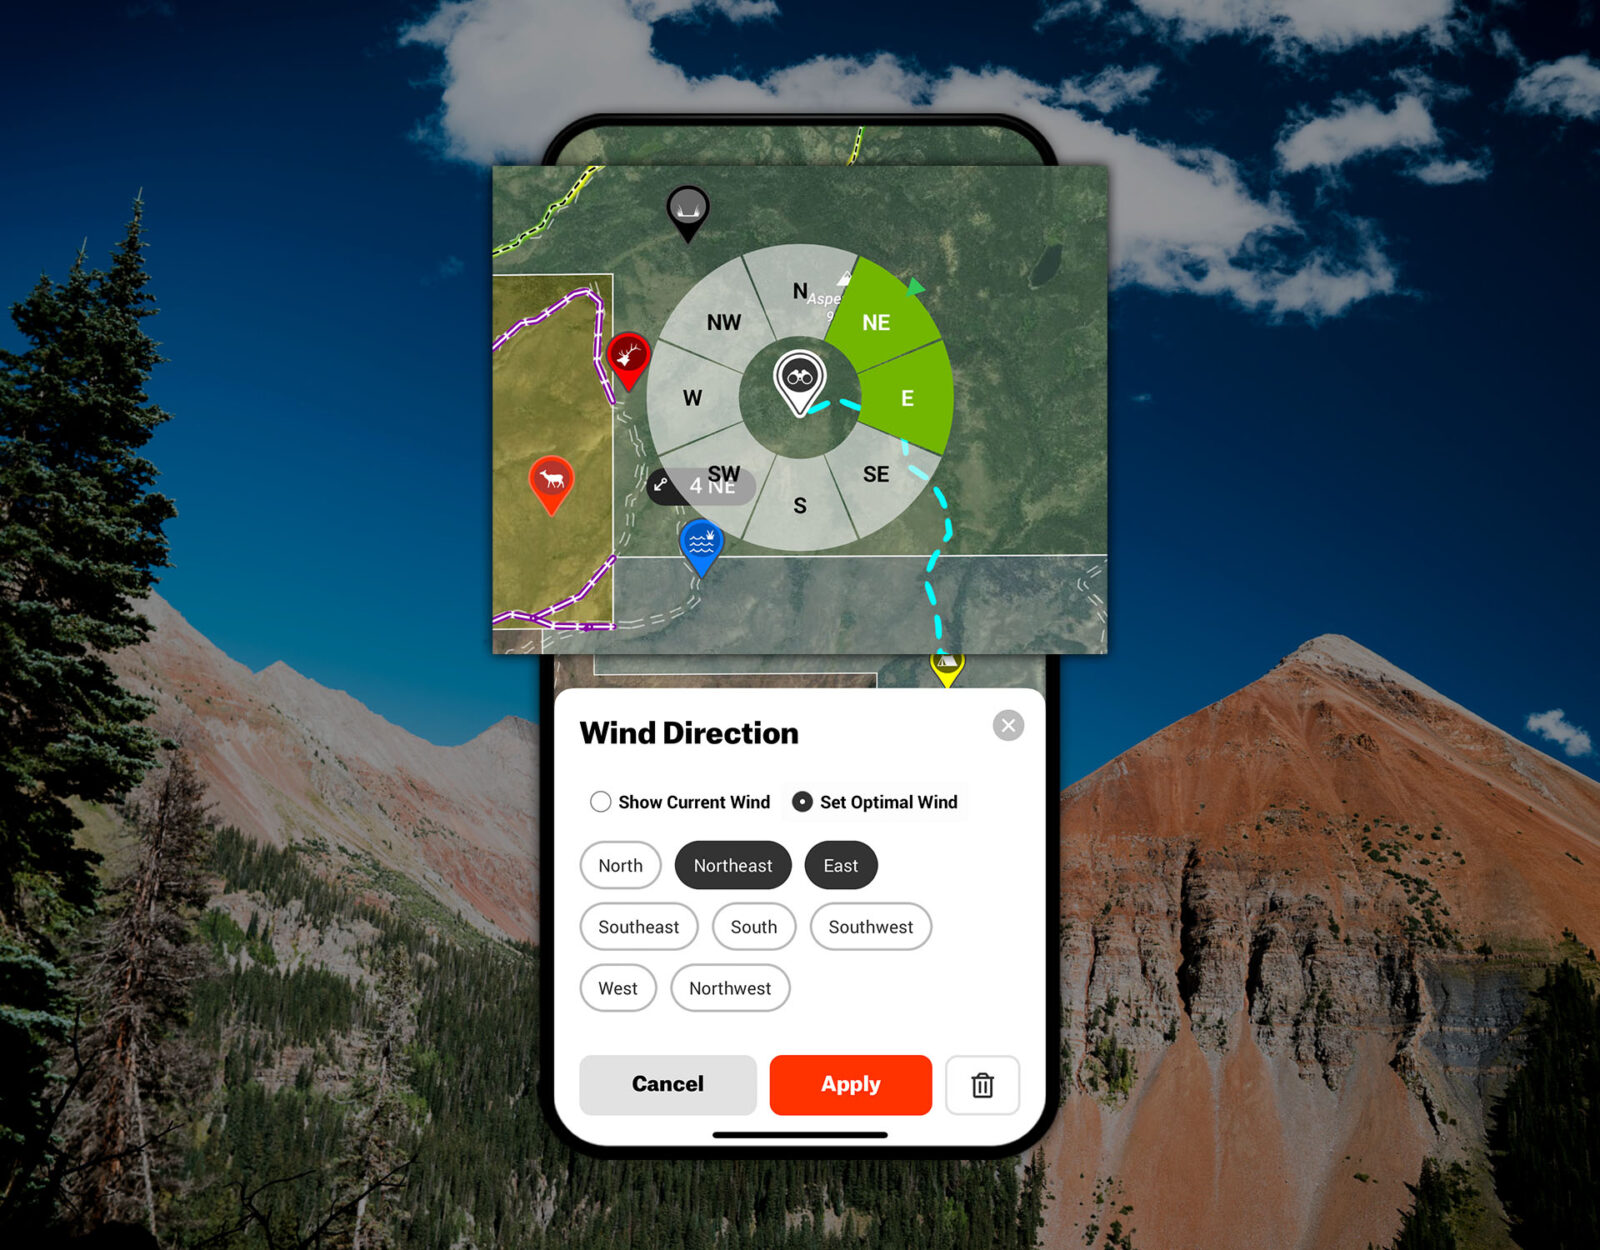
If you tap any Waypoint and scroll down beneath the coordinates, you’ll notice a “Waypoint Tools” section. In that section, you’ll see an option for “Wind Direction.” When you click on that, two options will appear, “Show Current Wind” and “Set Optimal Wind.” The Current Wind setting will provide the current wind direction and speed for the Waypoint.
The Optimal Wind setting is something that you can actually set to your liking. Say you need a southwest wind to hunt a certain area. Set the Optimal Wind to southwest, and the App will display above your Waypoint if the wind is good (green), okay (orange), or bad (red). Both settings are a fantastic way to study wind patterns in a piece of country before your arrival. Whether it’s picking the optimal ambush point or planning a route into a glassing spot, the more you know about the wind beforehand, the better off you’ll be.
Motorized Roads and Trails
Back before the days of digital mapping, I’d spend a hefty amount of time staring holes into my precious paper maps, marking areas with a pen, and wondering if I could even get into those areas via the roads. This wondering would then cause me to call the forest service in hopes one of them could provide me with road condition information. Fast forward to today, and all I do is turn on the Motorized Roads and Trails Layer. Done.
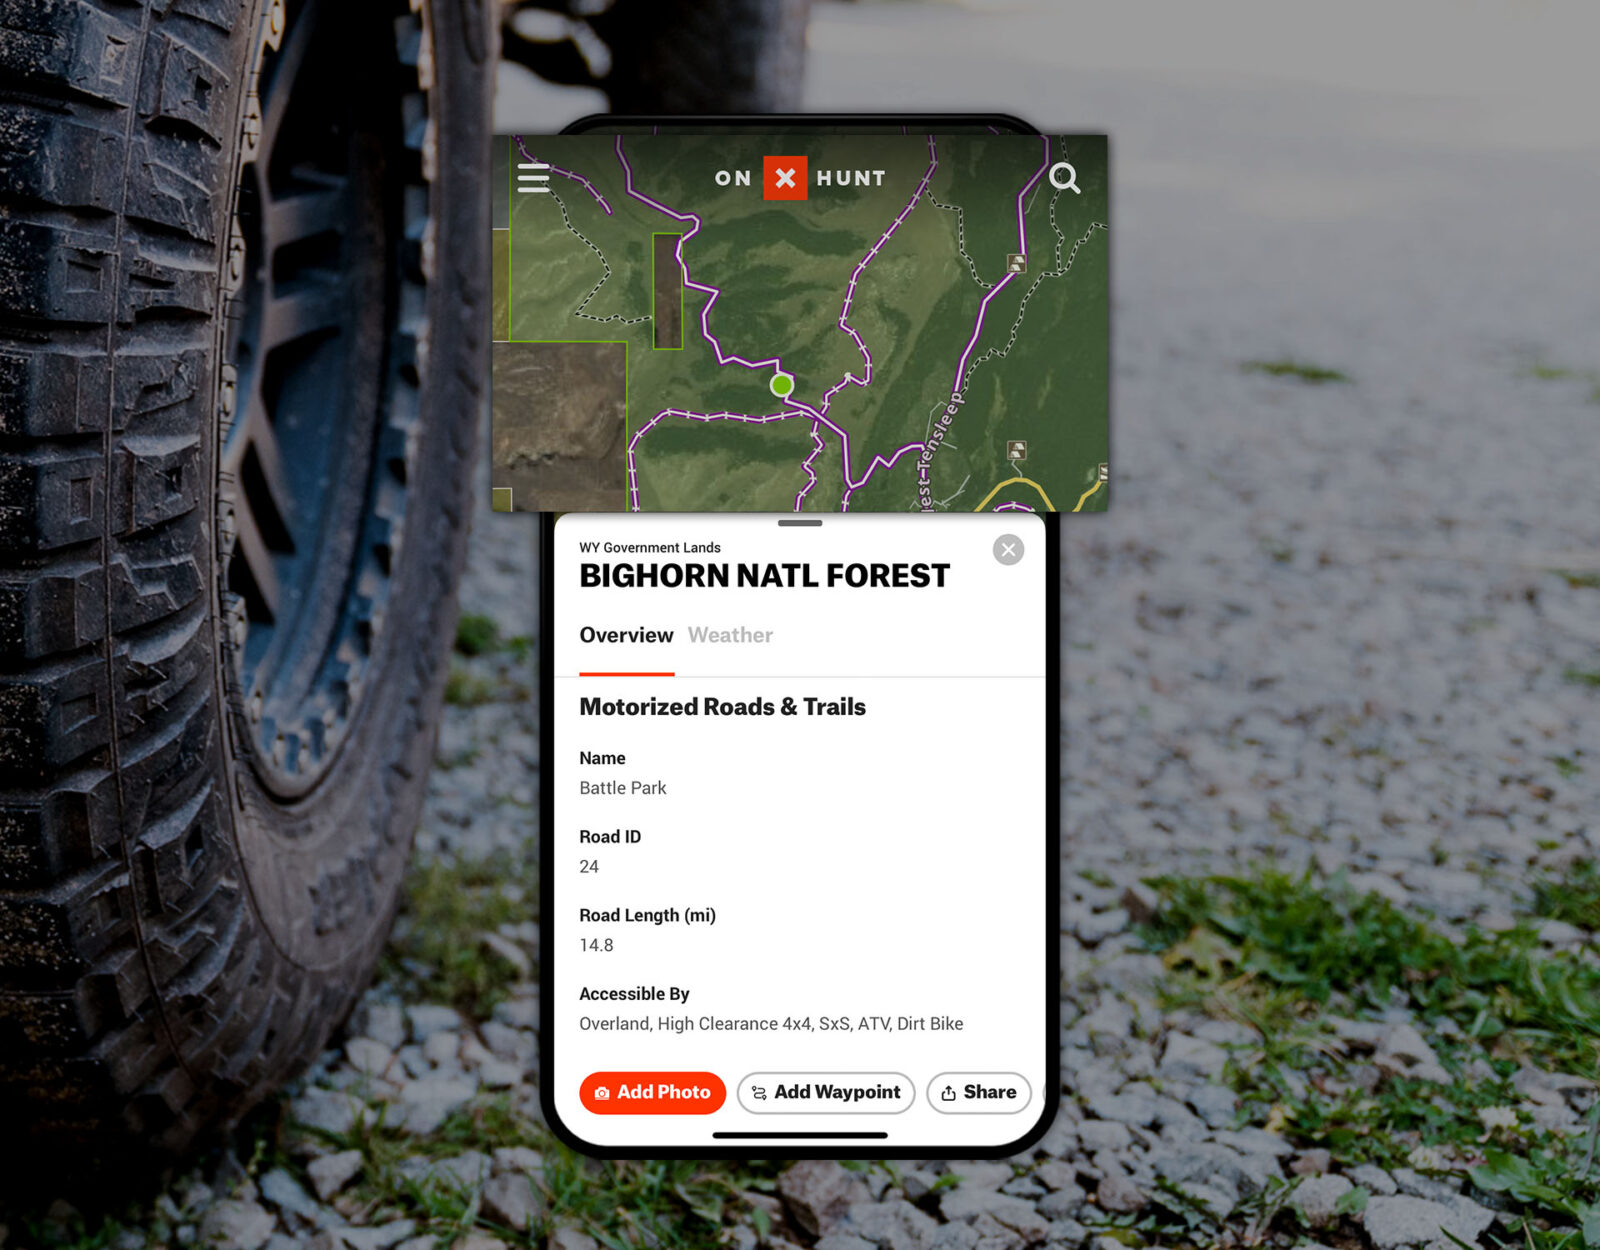
On the surface, the Motorized Roads and Trails Layer will highlight in purple any road or OHV trail with known motorized access. This is great in its own right. However, if you click on any road highlighted in purple, some info will pop up on the screen, including the name of the National Forest, county, and amount of acres in the area. Beneath that, though, you’ll see “Motorized Roads and Trails.” This will shine light on road length, if high clearance is required (or a SxS, etc.), the surface type, and even the open dates—all things I’d try and find out through my phone calls earlier in life.
A huge benefit to knowing when these roads are open is not only knowing when you can drive them but also when you can’t. Perhaps more importantly, it tells you when others can’t. I hunt a certain area for bears that has an open road during most of the year, but it’s closed during hunting season. This keeps out a fair amount of folks and provides some excellent hunting as a result.
Line Distance for Stalking
I do a whole lot of spot and stalk bowhunting. It’s one of my ultimate passions. One of the trickiest parts in the equation, though, is planning a stalk, finding the best route, and identifying pre-determined possible places to shoot from. For these reasons, I am borderline obsessive about my Line Distance Tool. The benefits here can easily be used for rifle hunting as well.
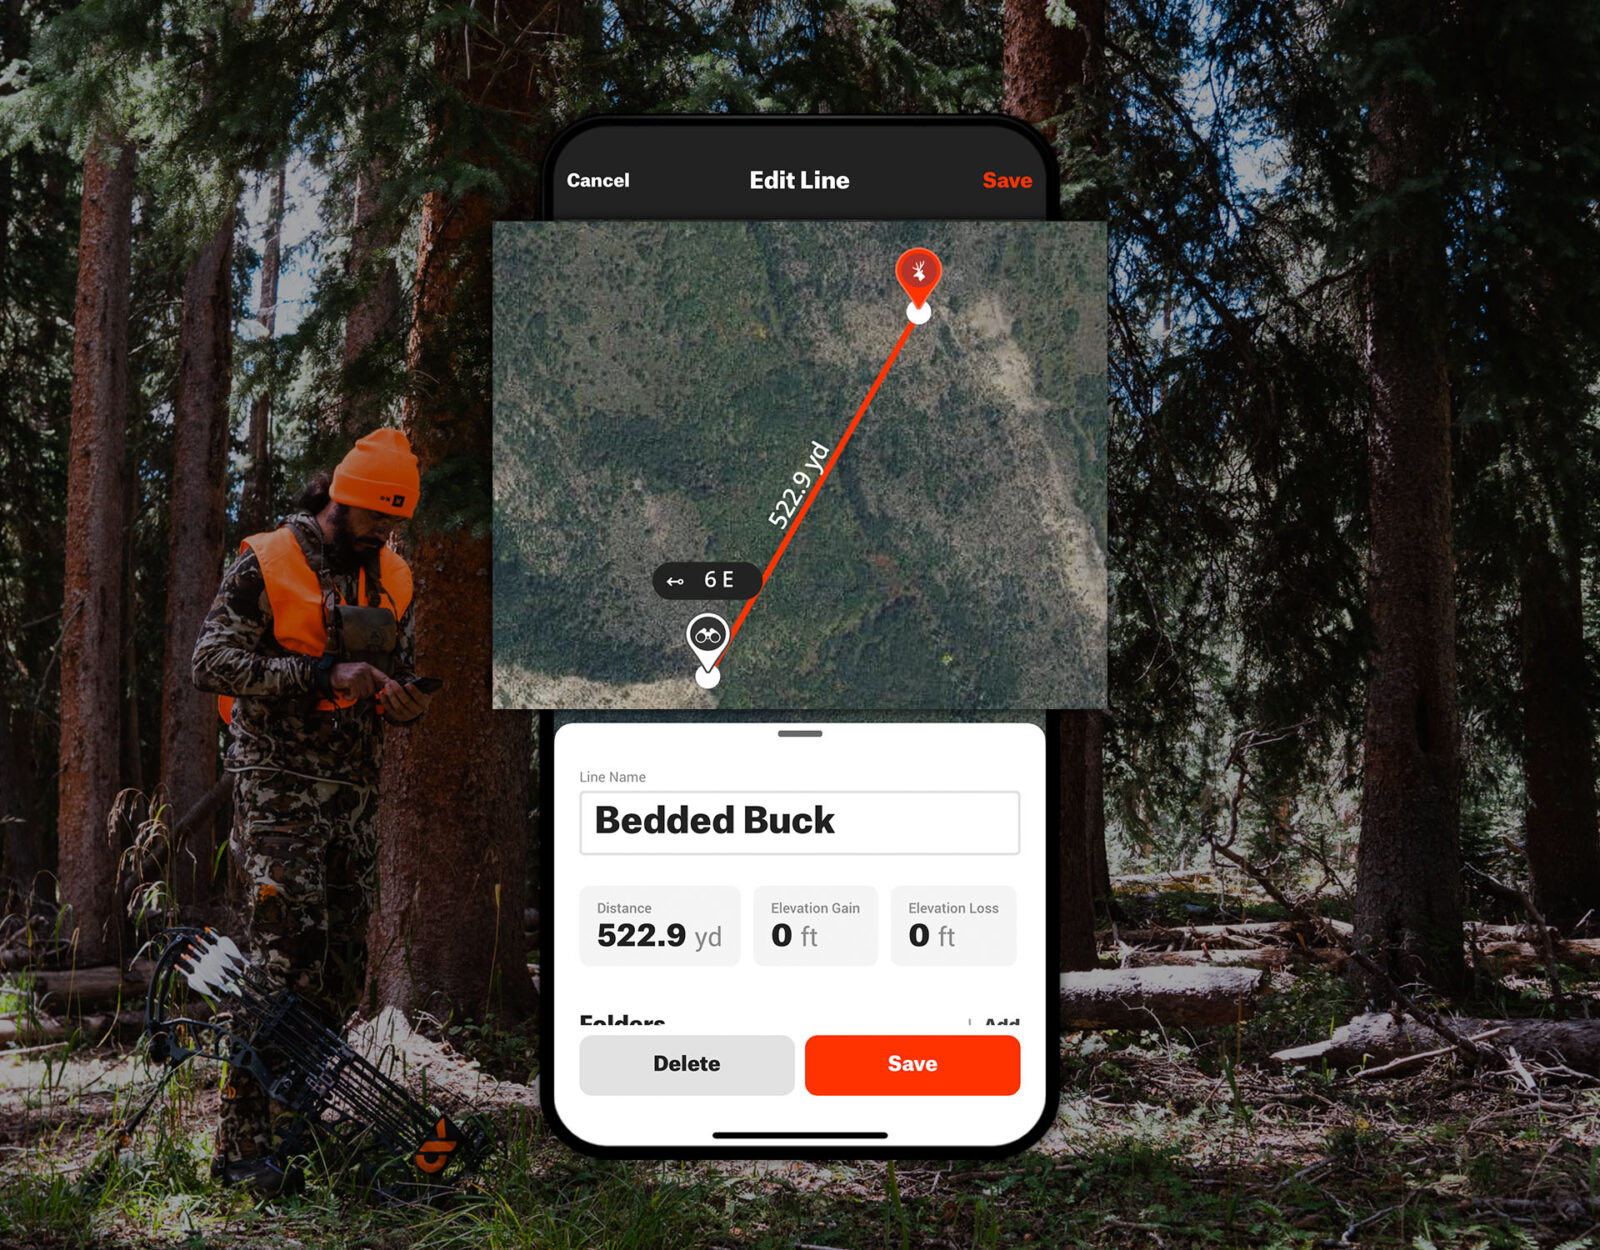
Once I have an animal spotted, I’ll immediately try and mark their position on my maps. From there, I’ll begin cooking up the best routes to take in order to close the distance. Once I get a route, I’ll go to “Tools” in the menu bar and tap “Line Distance.” With this little gem, I can literally draw out, dot by dot, my whole stalk in relation to the Waypoint I dropped for the animal. In between each dot, a distance will be displayed. Not only does this give a good sense for the actual distance I need to cover, but it also lets me know when I should be in range of the animal.
I’ve also used the Line Distance Tool when recovering animals in thicker country, particularly after cross-canyon shots with a rifle. By using the Line Distance Tool to determine where you’re standing in relation to your glassing spot, it can give you some perspective on exactly where you are relative to the range that the animal was at originally. In thick country, things never look the same once you get there. You may think you’re in the right area, but the Line Distance Tool could tell you you’re 100 yards too close. In that case, it’s time to climb.
The Sky’s the Limit
I’m one of those guys who will buy something, figure out a basic understanding of how it works, and then lay down a remark along the lines of “this thing does way more than I know.” Digital maps are no exception to that for me. Using what is on the surface will get you by and do it well. However, if you take the time to dive into the smaller details and put some exceptional effort into your mapping, you might be surprised at how handy these tools can actually be. They are on our side and want us to be successful out there.
What I’ve outlined above is just a fraction of what onX Hunt can do. Nonetheless, these things have helped me out in a big way. Little by little, variables that could otherwise encroach on our experiences can be chipped away because of a little more effort. Exceptional effort will provide exceptional results.

Hunting Regs Without the Hassle
Compliance shouldn’t be the hard part. FieldRegs is a free app from the team behind onX Hunt that helps you quickly find hunting regulations, seasons, and legal requirements without digging through agency websites and PDFs. No credit card required.