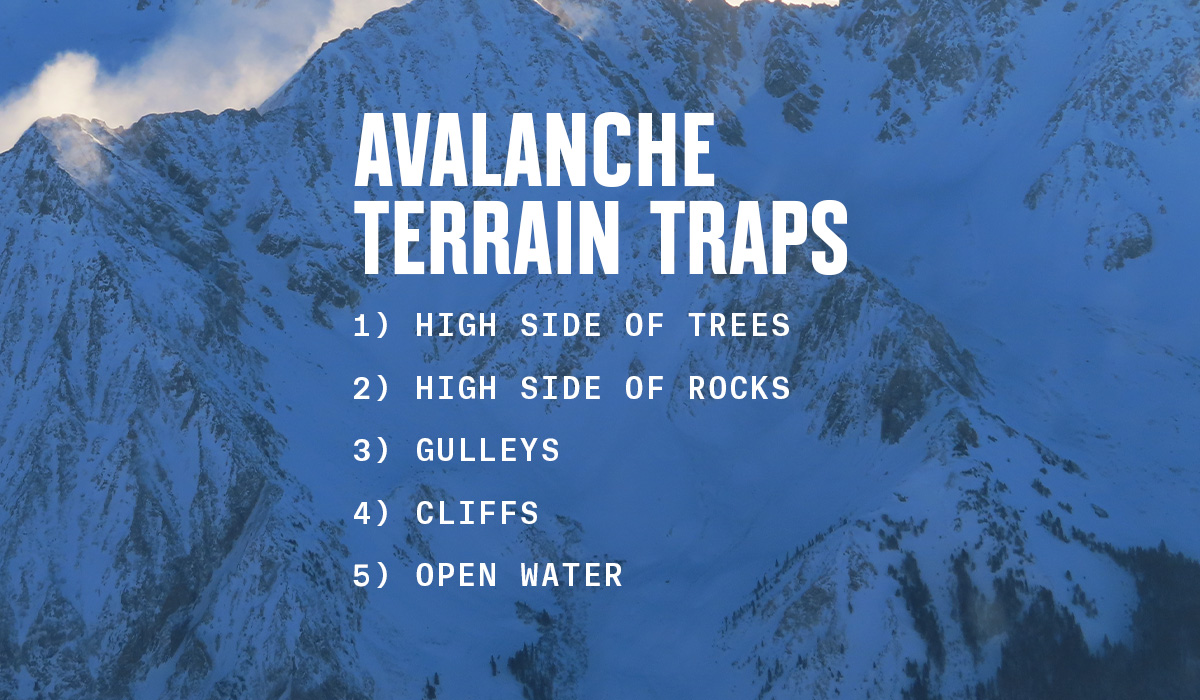
What It’s Like Taking an AIARE 1 on Mt. Washington
No matter your reasons, stepping foot into avalanche terrain in the winter warrants education, preparation, and respect. The former of these three things is where most of us begin, and that’s called an AIARE 1. Here’s a trip report from one onX Backcountry staffer’s experience on Mt. Washington.
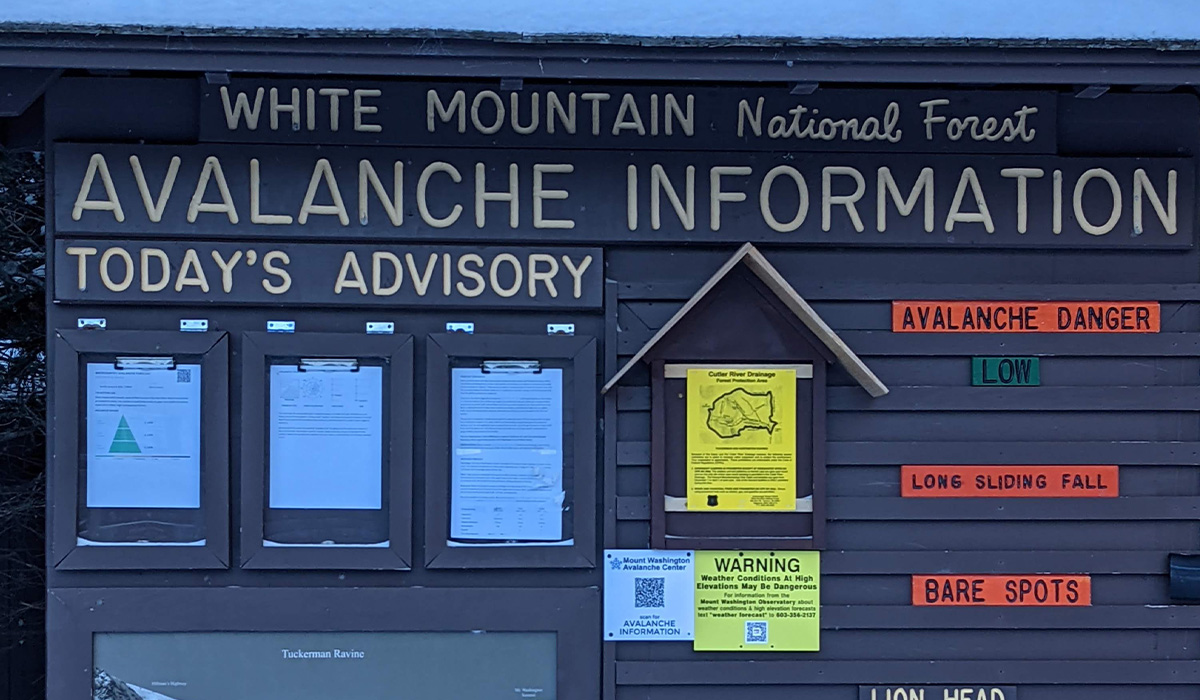
The avalanche forecast read “low” for the day’s danger rating.
We’d gotten four inches of new snow overnight, but it was on top of a thin layer of boilerplate nothingness. In its truest sense, it was low tide in New England. The crew, unbothered, was racing up the skintrack nearly tripping over their boots to get to the day’s high point. Winds down low were tolerable but, above treeline—howling. Froth levels were high amongst this group. The ridgeline would dance in and of clouds giving short glimpses of the objectives these skiers yearned for.
Again, avalanche danger was low.
We neared the top of the approach when we intersected with a descending group who informed us they’d triggered a slide. We asked questions about location, conditions, size, time, and propagation. It released on a north-facing slope and propagated across the narrow chute. The party was able to avoid getting caught in the slide, but it certainly humbled a crew that was spritely and excited. Our plan never included getting into avalanche terrain that day to begin with, but that certainly confirmed to us that we wouldn’t venture in.
Low doesn’t mean “no.”
Low means, “natural and human-triggered avalanches are unlikely. Small avalanches in isolated areas and extreme terrain,” according to the Utah Avalanche Center. And that’s exactly the kind of terrain we wanted to learn to ski. Sobered, and a little more educated, the crew pressed onward to practice rescues in a safe zone.
So What Is an AIARE 1?
AIARE stands for the American Institute for Avalanche Research and Education. It’s essentially the gold standard for avalanche training in the United States. Their Level 1 program is three days or 24 hours of instruction, centered on recreating in avalanche terrain. It introduces a framework of decision making, in-field navigation, terrain management, rescues, and a dusting of snow science.
Should I Take an AIARE 1?
Anyone who is trying to recreate in the backcountry in or near avalanche terrain should take the AIARE 1. Depending on your locale, participants can represent many different types of travel including skiers, snowmobilers, snowshoers, ice climbers, mountaineers, and others. Generally, it’ll be divided into human-powered vs. non-human powered, so don’t worry about having to keep up with snowmobiles.
It’s the first step in a lifelong practice of snow science and navigating safely in avalanche terrain. It teaches you essentials like reading the avalanche forecast, learning about slope angle, and navigating not only terrain, but the interpersonal dynamics you may encounter.
Let’s Get Into It
As a skier in the northeast, the pinnacle objective for most is Tuckerman Ravine on Mt. Washington. You may have heard about it through Cody Townsend’s The Fifty Project or that one token Ice Coast ski friend who’s grateful for anything other than bulletproof conditions. As someone who’s ski toured around many resorts, poked around the low angle zones of Granite Backcountry Alliance, and followed mentors into avalanche terrain on stable days, it was time for me to learn the skills in order to become a contributing member of the group. I wanted to be able to form my own observations of the snowpack, interpret conditions, and build confidence in rescue scenarios all while experiencing the majesty of Mt. Washington in winter.
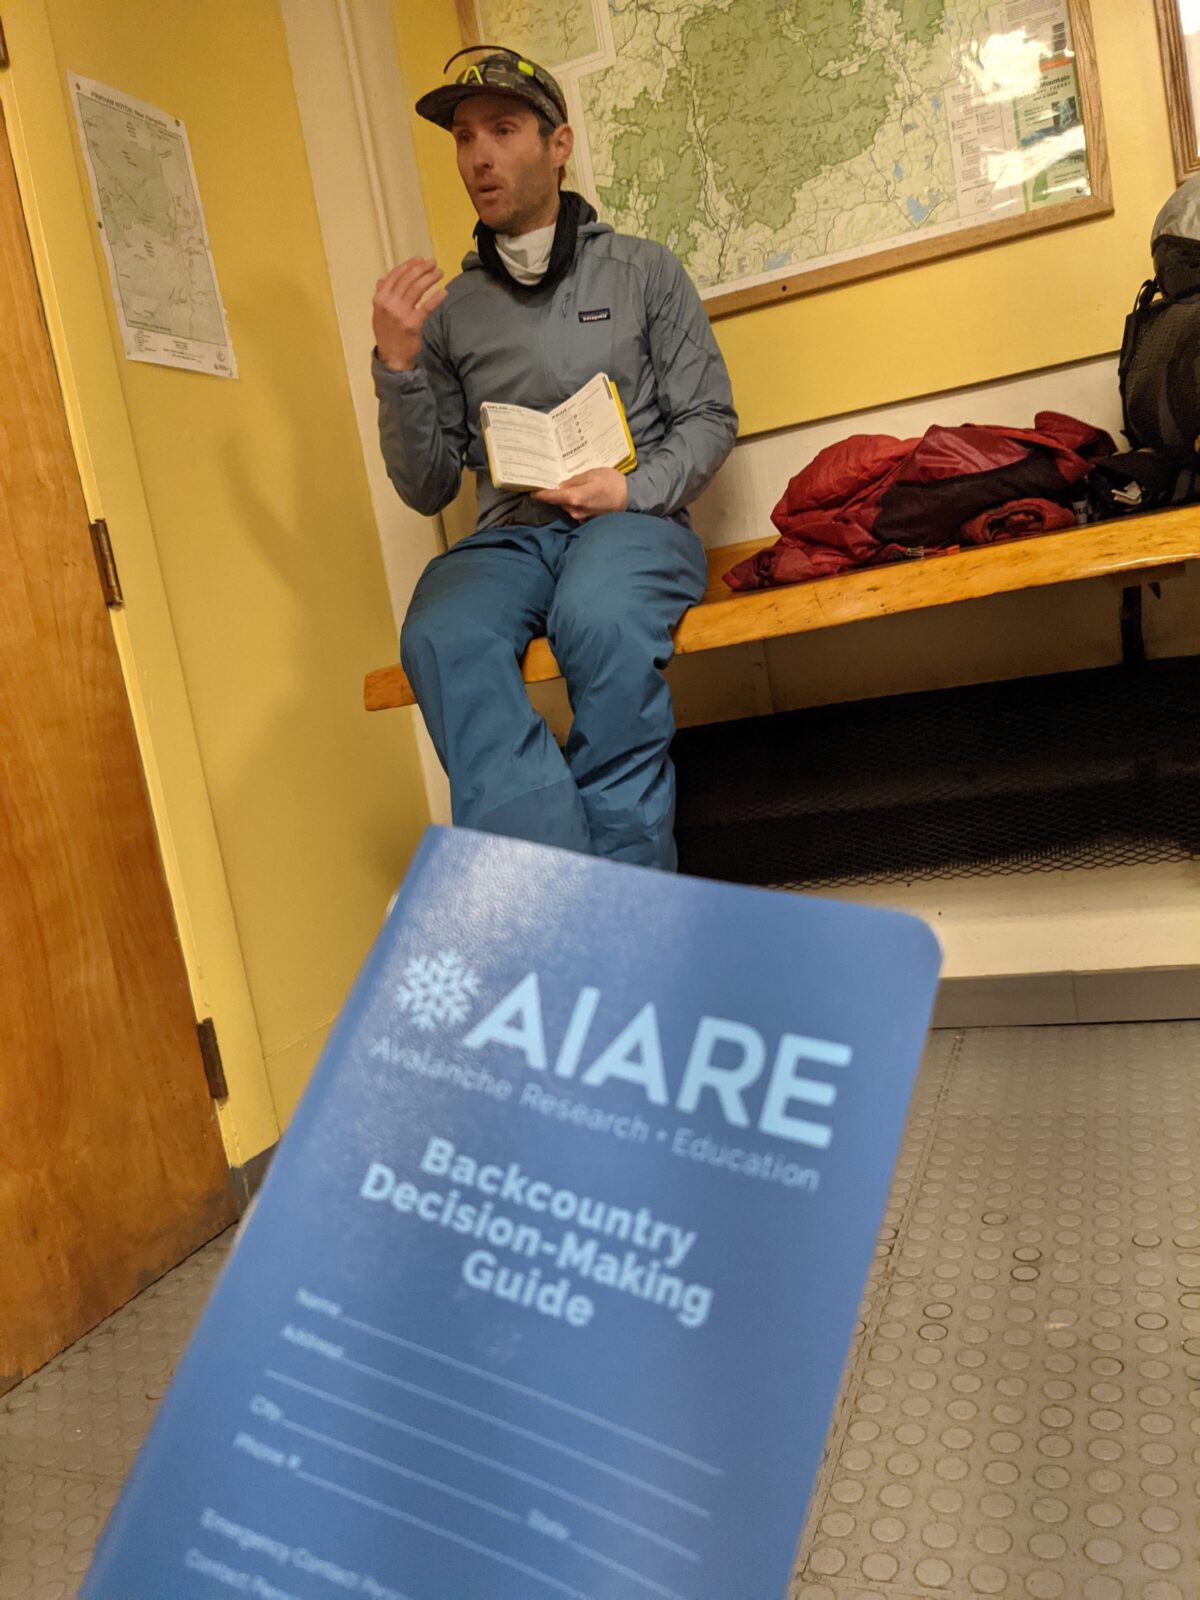
I signed up for a hybrid style course with Synnott Mountain Guides based in Intervale, New Hampshire. North Face Athlete and AMGA/IFMGA certified Mountain Guide Mark Synnott founded the company that delivers educational and guided trips in the disciplines of backcountry skiing, ice climbing, mountaineering, rock climbing, and hiking. The hybrid course meant I would take a three-hour zoom session, about four hours of independent online learning through the AIARE portal, and put it into practice for two days in the field with AIARE Instructor Blake Keogh.
Zoom Class
Night One opened with a round of introductions, our method of travel (mix of snowshoers and skiers), and where we were coming from. After that, we digitally dropped into learning about avalanche terrain. Once we understood the characteristics of potentially dangerous terrain, we talked about the AIARE framework—Plan, Ride, Debrief, and Teamwork. After three hours of thoughtful discussion, we adjourned to meet up at Synnott Mountain Guides headquarters bright and squirrely on Saturday morning.
Field Day: Day One
It was brisk, but not too cold by New Hampshire standards—about 25 degrees with the new snow clutching to the coniferous trees. New England has been doing what New England does this time of year, “the January thaw,” which meant we were all a little nervous about whether we’d actually have any snow to ski on or evaluate. What we’d come to find out is that Mt. Washington also has a way of combating this cycle, in which the northwest winds deposit snow onto the primarily east-facing lines of Tucks, leaving us some snow and an avalanche problem to navigate.
Day One began as every day in the backcountry should—with a group meeting. We discussed the plan for the day, the avalanche forecast, our risk mitigation tactics, and how we were all feeling about those variables. The day’s report called for “low” avalanche conditions with primarily a windslab problem developing throughout the day.
We chatted with a forecaster from the Mount Washington Avalanche Center (MWAC), who said that this zone has come a long way in terms of avalanche awareness and safety. Perhaps, you’ve heard about the pirate days of Tucks, where the era’s definition of avalanche safety was something like one part snow science, one part bluebird skies, and one part good karma, but that ethos has changed quickly. Now, it’s commonplace that everyone travels with the backcountry touring trinity—beacon, shovel, and probe.
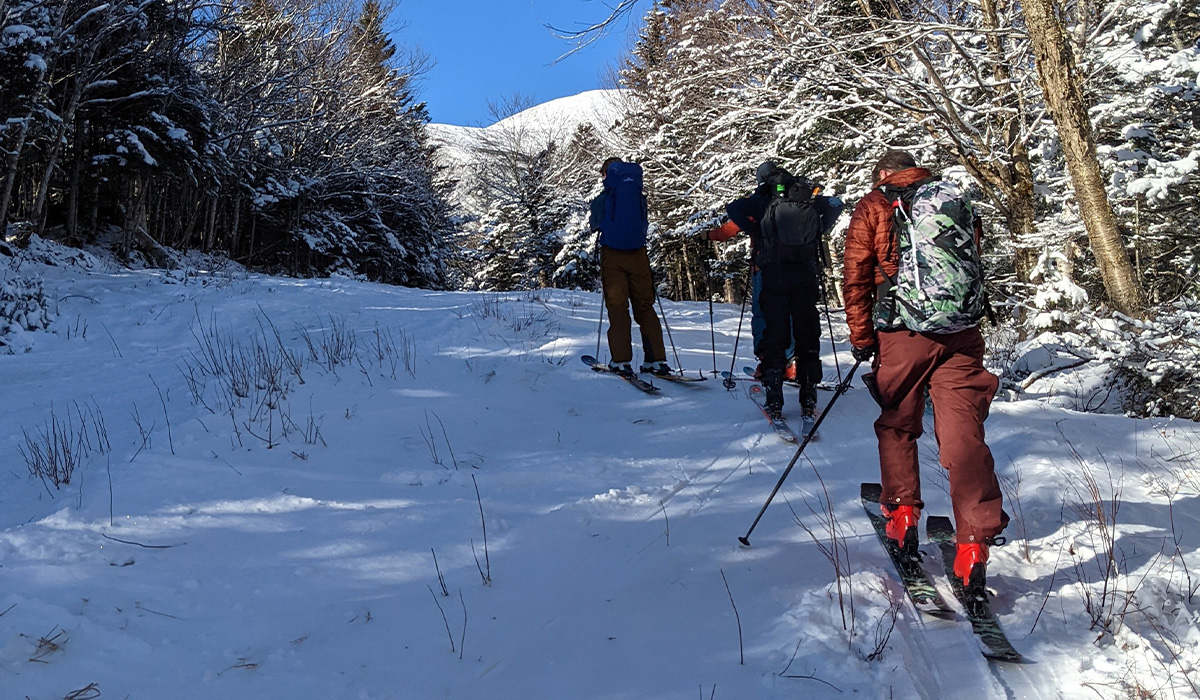
With alignment on the plan, we clicked into our touring setups, ran through a beacon check, stripped off our warm layers to begin the slog up the Tuckerman Ravine Trail (TRT). We stopped often to make observations about the snow, skinning conditions, and checking in on the day’s plan and associated timeline.
On some of the steeper slopes we dialed in some kick- and “AVA” turns. At every stop, I saw someone else shedding a layer, but by this time, they were already soaked through. I know it’s a tired trope, and you’ve heard it before, but one more time for the people in the back—Be Bold, Start Cold.
Once we reached our high point for the day, Hermit Lake Shelters at roughly 3,900 feet, we ran through some rescue scenarios led by our instructor, Blake. Full burial, partial burial, shoveling strategies, single-rescuer vs. multi-rescuer, and other variables were all addressed. I will point out, this was the coldest part of the day as it involved the most standing around and the highest elevation. It’s at this stage where an organized backpack, confidence in your gear, and composure were all tested. I’d go backcountry skiing again with anyone in our group from that day, but we all definitely learned something during that exercise.
After that, it was ski tips downhill for a very rocky descent, which as New England skiers, we were all too accustomed to.
Field Day: Day Two
It began similarly to Day One, and how every day in the backcountry should—with a group meeting. We discussed the avalanche report, which included the avalanche problem, how we were all feeling, what the weather looked like, and how all those factors would impact our objective for the day. The objective wasn’t to ski a rowdy line or get any glamorous ‘gram shots, but to build on the rescue training from Day One, and combine those with compression tests and hand shears.
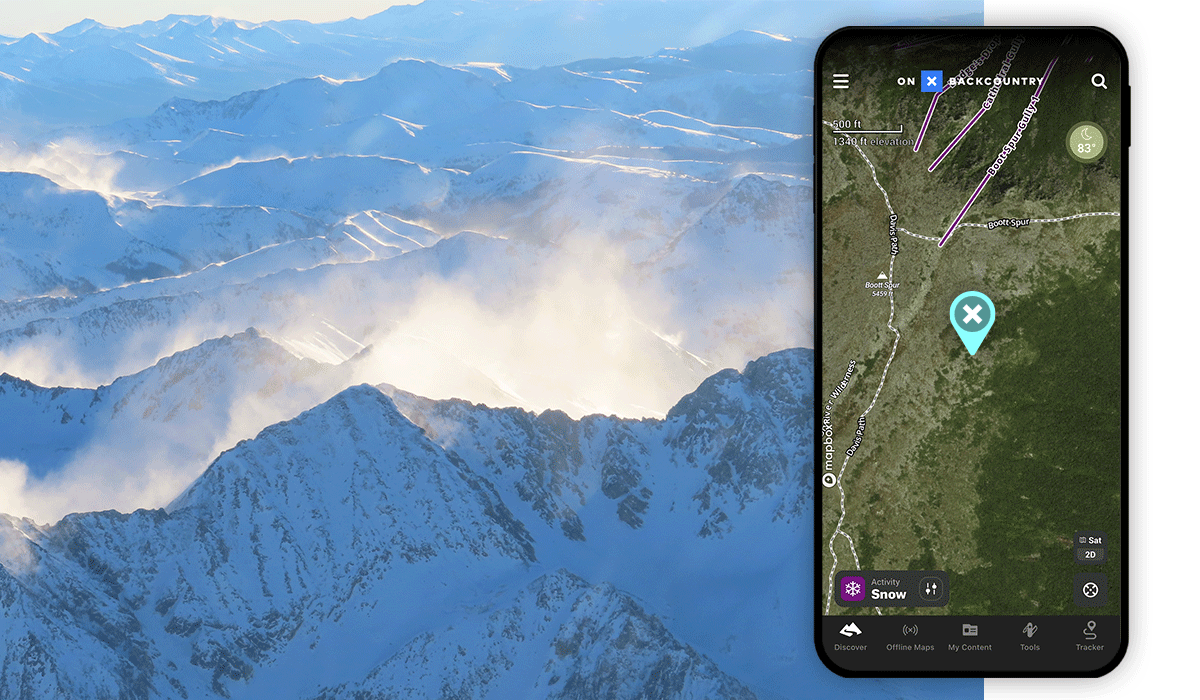
We used onX Backcountry to remove terrain from our consideration. The new snow was distributed onto south- through east-facing slopes between Night One and the morning of the second day by a 40 mph northwest wind. To help us in the effort, we enlisted a Waypoint with the “Wind Direction: Current” enabled. We used Slope Aspect to weed out south- and east-facing terrain and the Draw Shape/Measure Area to build a polygon around the ruled-out terrain. That way, at a quick glance in the field, we’d know if we’d ventured into the omitted area.
Seeing the digital mapping practice going on, one of the other forecasters from MWAC joined the group for a quick Q&A. We asked questions about the morning’s forecast. Given that human-triggered avalanches occurred the day before, the topic of conversation was the characteristics of a low and moderate forecast. He quizzed the group on what to look for throughout the day—wind slabs. He recommended that we look for wind-buffed or otherwise super-smooth–looking faces. “Stuff that looks fun to ski,” adds Keogh. A great reason to talk to a forecaster is that they’ll give you the proper scoop. And if you appreciate their work, consider a donation to their organization.
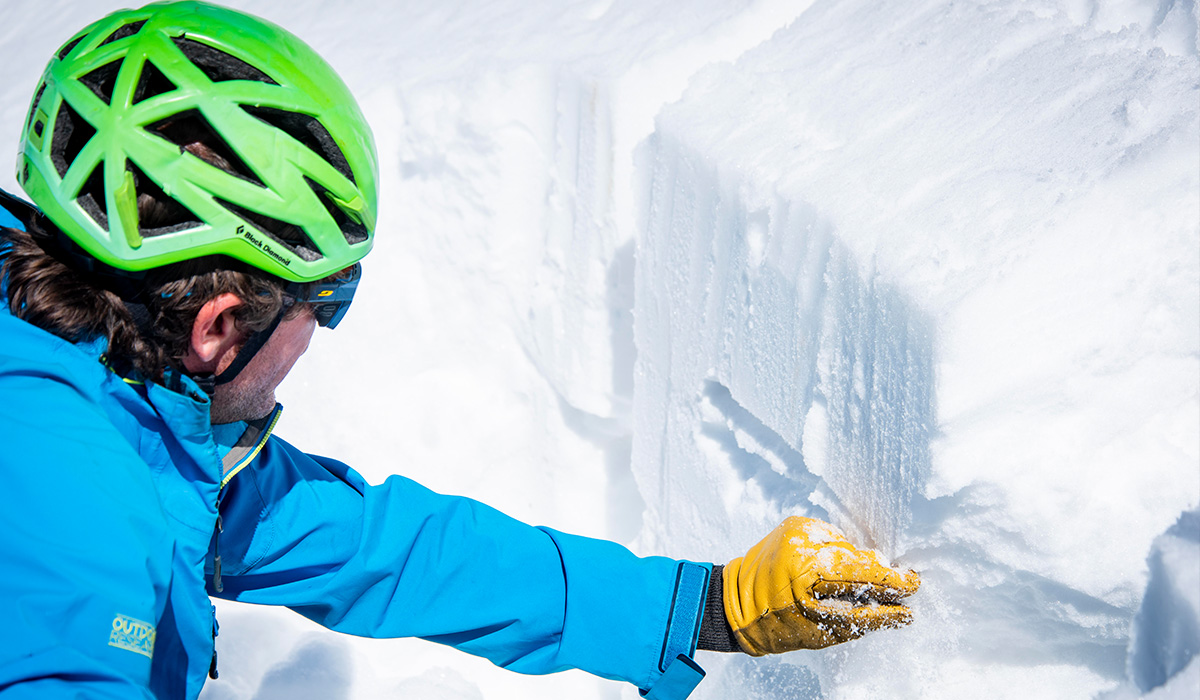
Day Two brought a slightly longer tour in which we did reach the bowl of Tuckerman Ravine. We could clearly see the crown from the previous days’ slide, which gave us a solid indication that conditions weren’t stable. We’d stay below anything consequential today and dig our pits well away from any runouts or other terrain traps. Using Satellite view ahead of time and dropping Waypoints for projected areas to dig a pit could save time when looking for both safe and effective places to dig.
After another long tour and A) finding enough snow and B) finding it away from any avalanche risk, we practiced digging a snow pit where we learned first-hand just how unstable this wind-loaded snow truly was. Using Slope Angle we were able to confirm we were on a 30+ degree slope: avalanche terrain. Results were varied between the smaller groups, but the most stability anyone found was failure at three taps of the wrist. Others reported failure upon isolation. Universal consensus derived that between the unstable snow and exposed hazards like rocks, brush, and other kinds of snow sharks, we wouldn’t go any higher. A textbook example of the AIARE framework at play.
So What Did I Learn?
- For me, “Be Bold, Start Cold” is an understatement. Unless it’s windy or rainy, I’m rocking a base layer. There were points where I was cold, but never wet. I’d rather be dry and cold than damp and cold any day of the week.
- Be ready with your gear.
- Click into those tech or frame bindings a few times. Know the difference between fun mode and skinning mode. Practice ripping and packing skins.
- Bring a base layer, a mid-layer (potentially with some weatherproofing material), and a parka—just the warmest dang thing you own. You won’t need that layer on normal backcountry tours, but this isn’t your standard backcountry tour.
- Refer to the gear list the course provider sends you and know how your body reacts in the mountains.
- Be engaged. This applies before, during, and after the class.
- There are so many great online tools out there you can brush up on beforehand. Here are a few from us and our friends.
- During the course, you best be sure that the instructor is going to have a breadth of knowledge. Whether it’s about the local zone, terrain management, or snow science—pick their brain and tip them accordingly.
- Lastly, this course is a foundation—the beginnings of a lifelong practice. You can practice rescues at home, read the forecast daily, and provide mentorship when applicable.
So What Now?
Having completed the AIARE 1, I’ll admit I’m pretty torn about my abilities in the backcountry. Without a doubt, I feel stronger as a group partner in both snow observations and rescues. However, I expected to walk away from that class ready to grip it and rip it down the headwall of Tucks, but that just isn’t the case. I think for some, including myself, that was a big lesson. This class isn’t designed to teach you about big mountain objectives, it’s the foundation of navigating in avalanche terrain.
I’m leaving the course with new patterns like reading the avalanche forecast every morning, having the confidence to lead a group on smaller and less-consequential terrain, and participating in groups with more aggressive objectives with my own perceptions and ability to contribute. However, my next step, and one that may take the most time, is finding a mentor with more experience than me but also matches my risk tolerance. That fine balance is something that really makes an exceptional ski partner.
Ready to take the course? Check out the AIARE Provider list or make the journey out east with Synnott Mountain Guides.