Sharpening a knife is a skill made to look easy but can take years to master. Knife sharpening is a precise movement of a blade across a whetstone, or similar surface, with the blade of the knife held at an exact angle, ideally 20 degrees. With repeating strokes, you set an edge and then hone it.
We didn’t have to look far for an expert on knives who could share a few tips on how to sharpen a knife. In Frenchtown, Montana, Josh Smith of Montana Knife Company and Josh Smith Knives was glad to share his earned wisdom on all things knives and their edges. Smith has been a professional knifemaker since age 11. At 15 years old, Smith passed the Journeyman bladesmith test and became the youngest bladesmith to ever pass it. This is a test where a blade must be forged and heat treated with the ability to chop a 1” rope in half, two 2x4s in half, and then still shave hair. At 19, he became the youngest Master Bladesmith in the world with the American Bladesmith Society.
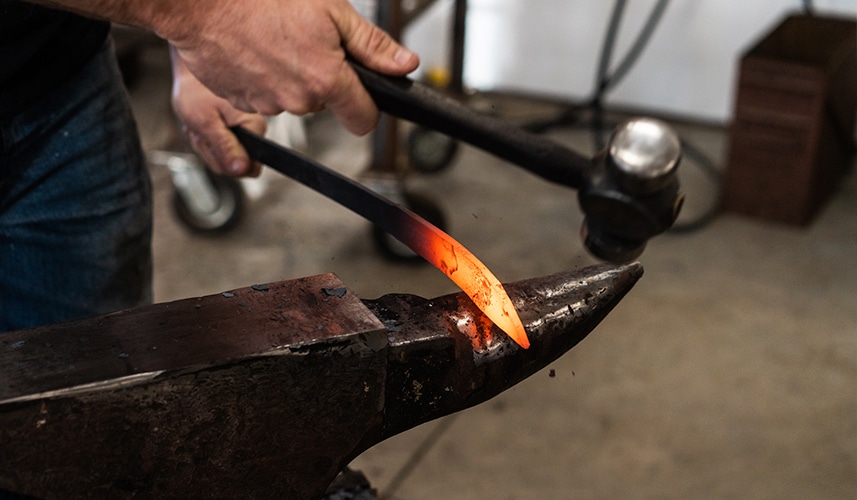
“A hunting knife is made to rip through hair and hide,” Smith says. “I want a microscopic saw.” Smith says this as he’s shaving small patches of hair off his arm. You could hear microscopic tearing as coarse dark hairs fell to the floor, leaving a quarter-sized bald spot behind. Seeing this freshly sharpened knife do its job was convincing enough to understand there is a subtle art to knife sharpening, so here’s where to start learning it.
Knife Sharpening Basics
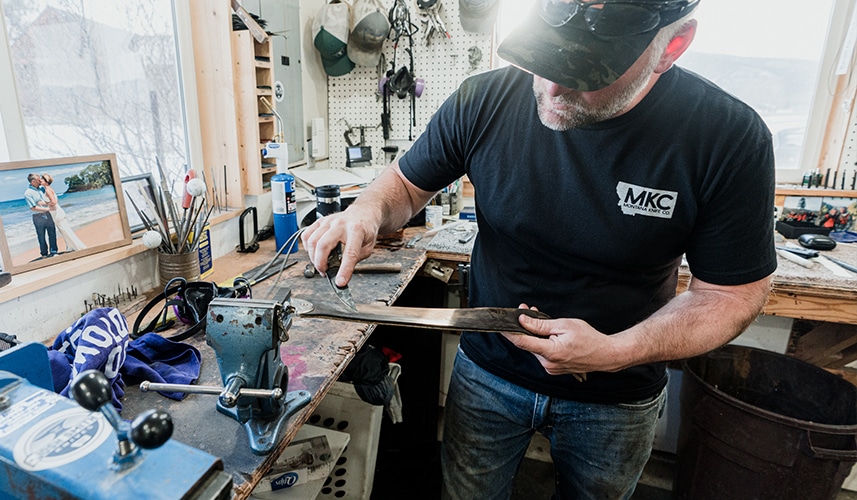
In order to know the best way to sharpen a knife, it’s important to lay a little groundwork and understand the distinctions between a hunting knife and other knives. Smith makes his knives with 52100 high carbon ball bearing steel. It’s highly wear-resistant but also responds well to sharpening. It can be hardened to between 60-67 on the Rockwell hardness scale (Rc), but the thing about steel and the Rockwell hardness scale is that when hardness goes up, toughness goes down. Extremely hard steel actually becomes brittle. For most utilitarian purposes, especially hunting, you want something that’s tough, but will give a little under stress instead of break. That’s why Smith makes his Montana Knife Company knives at a 60-61 hardness on the Rc.
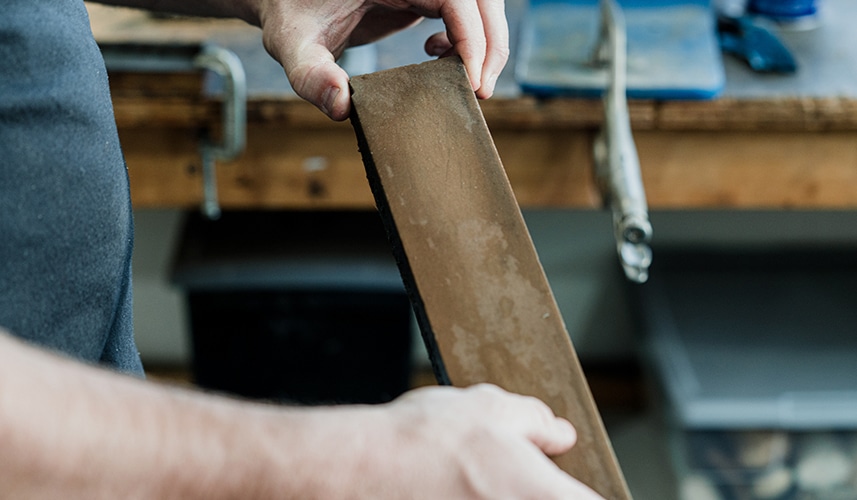
Next to steel quality, a knife may be more or less difficult to sharpen, or more or less quick to lose an edge, depending on how thick the steel is at the knife’s edge. For reference, Smith likes to bring his edges down to 1/10,000th (0.0001) of an inch starting with an already thin 0.095” blade thickness (just under 2.5mm).
“We make our blades with thin edges because it means there is less to remove when you’re sharpening it,” Smith says.
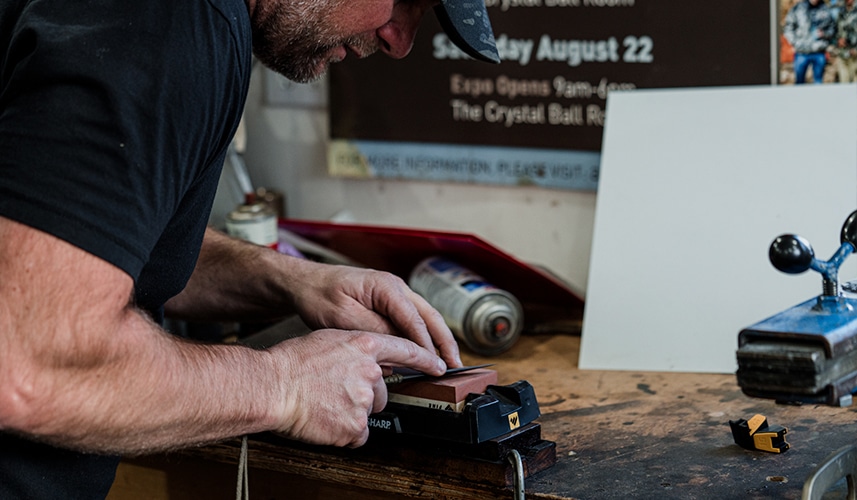
When Smith sets up to sharpen a knife by hand he’s thinking in two primary steps, followed by a “final touch” on a leather strop. The two steps are to “set your edge with the rough side of a sharpening stone and finish your edge on the smooth side,” Smith says.
In Smith’s shop, he steps up to a Work Sharp Whetstone, giving it a quick douse of WD-40, and puts the tip down to push the blade away to the heel. His technique is the opposite of what you often see written about knife sharpening, where you start at the heel of the knife and push the blade away from your body as if you’re peeling the bark off a stick. With Smith’s approach, he can use a couple of fingers on his non-knife-holding hand to apply even pressure on the blade the entire length of the drawing motion.
“You work backwards to set your edge,” Smith says. “Wait until you feel a burr over the entire length of the blade, then go in the other direction. Next, lighten your pressure and alternate strokes.”
Smith prefers setting his knife edge with a 220 grit stone and then finishing on a 600 grit, but he also keeps a double-sided 1000/6000-grit whetstone on hand, which is most often used for culinary knives. “A chef’s knife is made to push through something,” Smith says. “A hunting knife is a knife that wants to cut.”
He eyes the angle of his knife on the stone, aiming to keep it “between 15 and 20 degrees.” When he’s done setting and smoothing his edge, he moves to a leather strop. With a strop, it’s important to keep the knife at the same angle it was on the sharpening stone. If you have the knife too shallow you won’t actually make contact with the edge, but if you come in too deep you risk dulling the edge. On a strop, you also want to pull the knife inward, not push the blade away. This allows the fine materials that’s taken off (ie. the burr) to fall off the edge instead of getting folded over itself.
“Look for the fine scratches left by uneven burrs,” Smith says. It might look like tiny claw marks on the leather. If there’s too many claw marks, go back to the fine grit stone for a few more swipes. The brushed look left on the leather after stropping should look even, indicating an even edge the entire length of the blade.
When Smith is in the field, he might carry a small ceramic rod or 2-3” diamond stone, “just for freshening the edge.” The real work is done at home.
How To Sharpen a Knife
Here’s a recap of sharpening a knife, step-by-step.
Soak the sharpening stone.
Soak the stone in water if it’s a water stone or lubricate with oil if it’s an oil stone (ie. honing oil, mineral oil, WD-40, etc.).
Set your knife angle.
Set your knife down at the correct angle, about 20 degrees.
Draw the blade.
Draw the blade across the stone, careful to follow the shape of the blade and to cover the entire length of the blade. Your stroke can be straight or circular, from “heel to tip” or “tip to heel,” whichever is more comfortable. With a shorter stone you may need to stroke in a straight direction.
Create a burr.
Repeat the drawing process on the same side until you create a burr. Then turn the knife over and work the other side of the blade in the same manner. Once you’ve created a burr on each side, change to a finer grit sharpening stone and repeat steps 3 and 4.
Use a strop.
Once satisfied with the edge you’ve created, use a leather strop to work the burr off the blade.
Test the edge.
Test the edge on a sheet of newspaper. Hold a single sheet of newsprint about shoulder height and place the blade on the top edge at a shallow angle. If the blade is sharp it will bite and start to cut. If your blade is dull or you’ve left a burr on it the blade will skip along the edge or tear the paper. Cut the paper with the entire length of the blade. Any hangups will show you’ve left a burr in the spot or the blade has a nick.
Knife Sharpening Tips and Tricks
A sharp knife is a safe knife, people say. If you don’t have to compensate for a dull knife by applying additional force to cut something, you’re less likely to slip up and slash something you don’t want to. So far we’ve covered how to sharpen a knife using designated stone at home, where you have time and space to perfect an edge. What follows are a few knife sharpening tips and tricks that will both help you refine your technique and serve you in the field in a pinch.
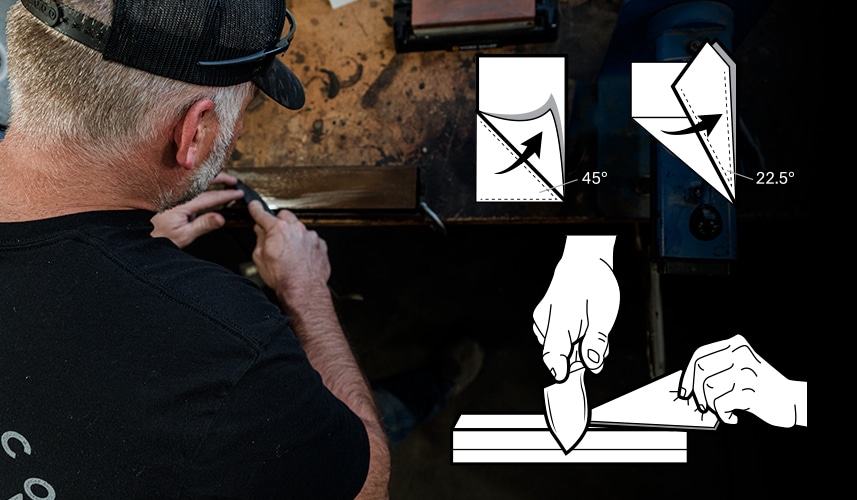
We talk about the importance of setting a knife on a stone at the right angle, about 20 degrees. But do you know what 20 degrees looks like? Here’s a quick and simple way to make your own angle guide with a sheet of paper (see illustration above).
Fold the bottom left corner of a piece of paper so the bottom lines up with the right edge. What you’ve just made is a 45-degree angle. Now fold the creased edge to the right edge once more, like you’re making the wing of a paper airplane. Now you’ve made a 22.5-degree angle, which is really close to the ideal 20 degrees. Lay the guide on the stone and rest your blade along the paper’s spine and you have a visual guide for the approximate you’re after.
If you’re looking for a way to check your progress as you sharpen, you can use a Sharpie to “paint” the knife’s edge bevel. After a few strokes on the stone, you’ll have a visual cue for your progress. If the ink is being removed just near the edge of the bevel, you’re sharpening at too steep an angle. If the ink is coming off near the shoulder of the bevel, your angle is too shallow. Aim for removing all the ink at the same time.
Everyone needs a good parlour trick in their repertoire, so here’s a knife sharpening hack for just that occasion. Suppose you’re at a friend’s house preparing a delicious meal from some game meat you brought over and you need to hone a knife’s edge but you don’t have a stone or ceramic rod nearby. You can pull out a ceramic coffee mug from the cupboard and turn it upside down to use its raised rim (if it has a dull finish). Place the upside-down mug on a non-slippery surface and lay the knife blade on the rim at a 20-degree angle, stroking the edge into the ceramic with medium pressure. After 10 strokes, repeat on the other side.
Knife Sharpening Systems
onX is fortunate to have a substantial number of hunters who work here who are diligent about keeping their knives sharp. We checked in with a few of them to share their favorite sharpening systems and stones they personally use at home or in the field. If you’re looking for a system yourself, you might consider one of these:
- Ken Onion Edition Knife Tool & Sharpener ($149.95) – “Super quick and easy to change angles and do multiple knives,” says onX Offroad Marketing Manager Custis S.
- Spyderco Tri-Angle Sharpmaker Set ($108.00) – “My favorite,” says onX Software Development Engineer Rob L.
- KME Precision Knife Sharpening System Deluxe Kit ($319.95) – “I’m a little OCD about sharp knives,” says onX Software Development Engineer Devin N.
- Fällkniven DC4 Diamond/Ceramic Whetstone ($32.95) – “Small, lightweight, and well made,” says onX Writer Christian F.
- Minosharp 3 Sharpener ($79.95) – “For meat processing, I use a flexible boning knife and a chef’s knife. I keep those sharp with this,” says onX Engineering Director Lance F.
Photos by Dave Fields