
Avalanche Risk & Avalanche Danger: 5 Red Flags to Watch
Backcountry skiing and splitboarding can involve serious avalanche risk, especially when avalanche danger is elevated or conditions are changing fast. This guide covers (1) five field-tested red flags that signal rising avalanche danger and (2) the best mobile apps to check avalanche forecasts, terrain, and recent incident reports before, and during, your tour.
Important note: No app can tell you whether a specific slope is safe in real time. Treat apps as decision support tools. Always use your local avalanche center forecast, choose conservative terrain when hazard is elevated, and get proper education and mentorship.
Five Red Flags That Increase Avalanche Risk
These red flags are simple on purpose: they’re the kinds of clues you can notice quickly. The more you see, the more you should downshift your objective, choose lower-angle terrain, or turn around.
1. Recent Snowfall

Fresh snow often means fresh instability. New snow can overload weak layers, create storm slabs, or combine with wind to build denser slabs on leeward aspects. Avalanche danger is often higher during a storm and in the 24–48 hours after it, especially if snowfall totals or rates are significant.
What to do:
- Check the avalanche forecast before you leave: danger rating, avalanche problems, and where the problems are most likely (aspect/elevation).
- Adjust terrain to conditions: prioritize “simple” terrain, low-angle slopes and avoid being under steep start zones.
- Pay attention to snowfall rate, density changes, and how quickly the storm is loading terrain.
2. Signs of Recent Avalanches
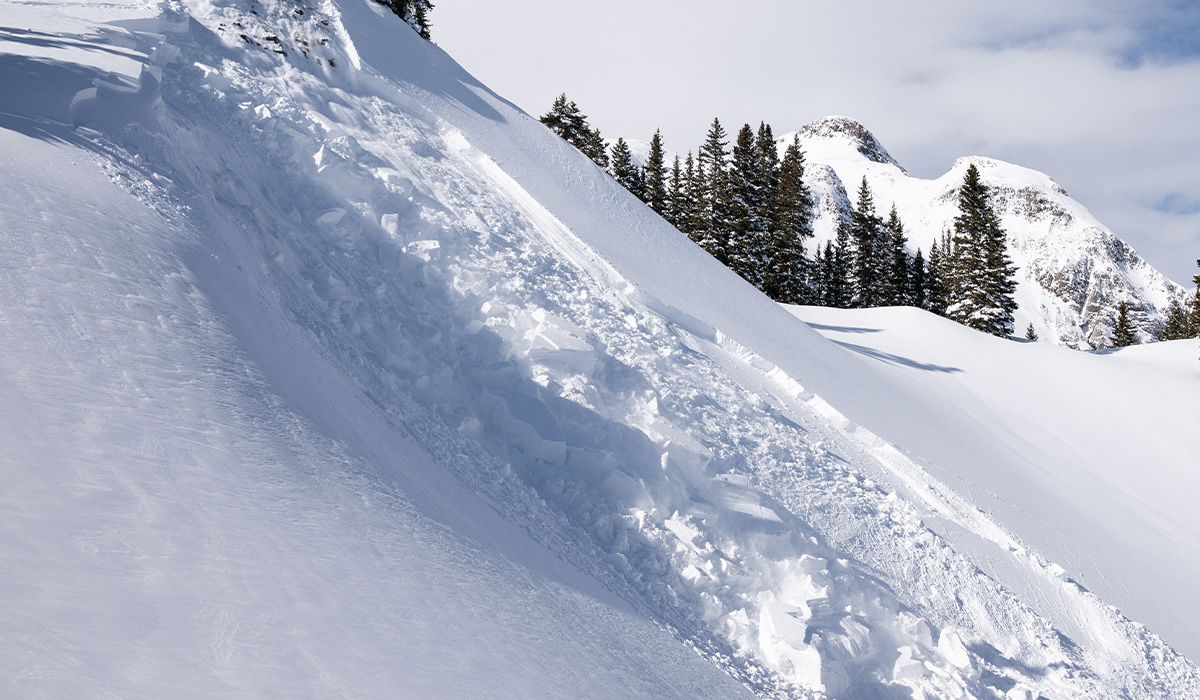
Recent avalanches are one of the most direct signs of unstable snow. If you see fresh crowns, debris piles, or hear reports of recent slides nearby, assume similar slopes could also be primed.
What to do:
- Treat recent avalanches as a hard stop for steep terrain: choose a different zone or keep your day to low-angle objectives.
- Look for connected terrain: even if your slope looks small, it may be part of a larger avalanche path.
- Use incident reports (when available) to understand what’s failing and where.
3. Collapsing or Cracking
Whumphing (collapsing) and shooting cracks indicate the snowpack is failing and transmitting fractures—classic slab avalanche behavior. If the snow is talking to you like this, it’s telling you to back off.
What to do:
- Move to low-angle terrain and avoid slopes that are steep enough to slide.
- Reassess your plan as a group: if you’re getting cracking or whumphing, your avalanche risk is elevated even if the slope “looks” fine.
- Avoid crossing under steep slopes or traveling in runout zones where an avalanche from above could reach you.
4. Rapid Rise in Temperature
Warming can quickly change the snow surface and weaken bonds within the snowpack. Rapid temperature increases—especially with sun—can increase avalanche risk through loose wet avalanches, wet slabs, or faster-than-expected instability.
What to do:
- Start early and aim to be off sun-exposed slopes before significant warming.
- Watch for rollerballs, pinwheels, or wet loose sluffs—these can be early warnings that the snow is losing strength.
- Avoid terrain traps (gullies, depressions, cliffs) where even a small slide has big consequences.
5. Strong Winds, Blowing and Drifting Snow
Wind can build slabs quickly—even without a big storm. Blowing snow and visible drifting are signs that wind slabs may be forming on leeward slopes and cross-loaded features like gullies and sub-ridges.
What to do:
- Avoid wind-loaded start zones and be extra cautious near ridgelines, rollovers, and convexities.
- Look for smooth, rounded, pillow-like snow; cracking around skis; or hollow, drum-like feel.
- Use the forecast to identify which aspects/elevations are most wind-loaded today.
How to Check Avalanche Risk Before You Drop In
Use this quick workflow every tour and repeat it when conditions change:
- Check the official avalanche forecast for your zone (danger rating + key problems).
- Confirm conditions on the ground: new snow, wind loading, warming, and any recent avalanches.
- Match terrain to conditions: avoid steep start zones and overhead hazard when hazard is elevated.
- Monitor in the field: if you see red flags, downshift objectives or turn around.
Best Apps to Check Avalanche Risk and Avalanche Danger While Skiing
If you want avalanche information in your pocket, use a forecast app plus a mapping/terrain app. Forecasts tell you the regional danger rating and key avalanche problems; terrain tools help you avoid steep avalanche-start zones and manage exposure.
Best Avalanche Forecast Apps
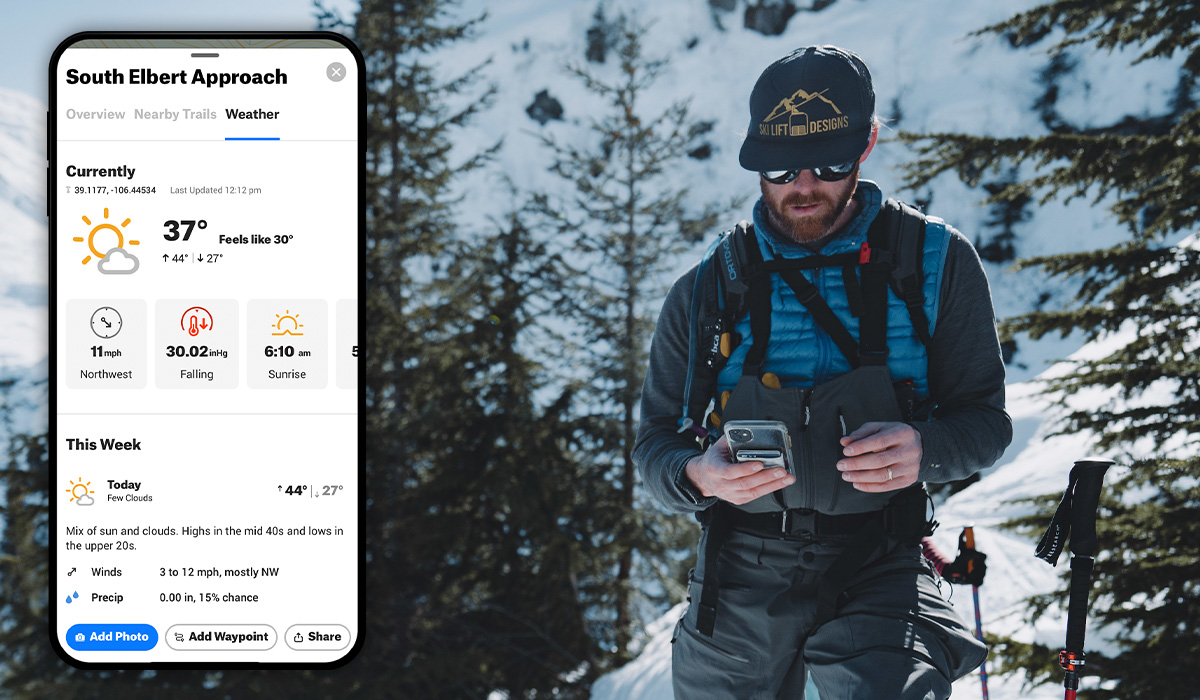
- onX Backcountry (Avy Forecast + Incident Reports): View avalanche forecast zones and recent incident reports in Ski Tour Mode. Use it to connect today’s danger rating to what’s happening in the field and to plan conservative routes.
- Avy (NWAC): A forecast-and-weather app supported by participating avalanche centers. Helpful if you want quick access to danger ratings, problems, and recent updates.
- CAIC (Colorado Avalanche Information Center) app: A go-to forecast tool for Colorado, with weather and the ability to submit observations.
- Avalanche Canada app: Daily forecasts and map-based information for Canadian regions.
- Avalanche Forecasts (North America): An at-a-glance map of danger ratings across many forecast zones, with tap-through to details from local centers.
Best Mapping/Terrain Tools (To Reduce Avalanche Risk)
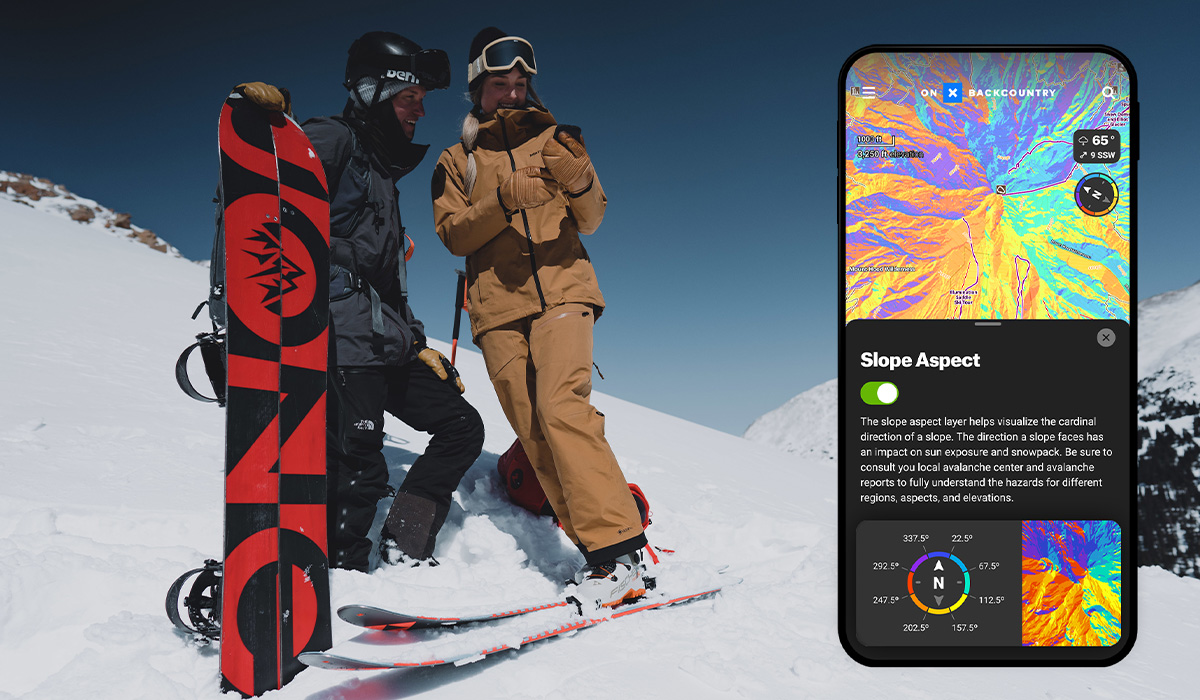
- onX Backcountry: Pair avalanche forecast zones with terrain context while planning. Use terrain awareness to avoid exposure to steep start zones, overhead hazard, and connected avalanche paths when conditions warrant.
Pro-tip: Click through to the experts for the most intel. Some apps aggregate information; when in doubt, tap through to the official bulletin from your local avalanche center.
Avalanche danger is dynamic, and avalanche risk is personal. Use the forecast, watch for red flags, and choose terrain that matches the day. When uncertainty is high, the best call is often the simplest one: dial it back and come home with a plan for the next tour.
If you’re building your backcountry decision toolkit, pair authoritative forecasts with a mapping app that helps you visualize terrain and plan conservative routes—then let what you observe in the field guide your final decisions.
Avalanche Danger FAQs
Avalanche danger is the published hazard rating for a forecast zone. Avalanche risk is your real-world likelihood of triggering an avalanche based on today’s danger rating plus your terrain choices, group decisions, and what you’re observing in the field.
Several tools can help. onX Backcountry can display forecast zones alongside terrain context, and Avalanche Forecasts provides an at-a-glance map of danger ratings across many forecast centers (with tap-through to details).
The CAIC app is the go-to for Colorado forecasts, weather, and submitting observations, but the onX Backcountry app is also a great resource for determining avalanche risk in the backcountry.
Yes. When available, you can reference incident reports and use them as another input when planning terrain and timing decisions.
Recent snowfall, signs of recent avalanches, collapsing or cracking, rapid warming, and strong winds with drifting snow are major warning signs to reassess your plan.